Research a Critter: Tell Its Story with Pop-Ups and Paper Circuits
Engage your students with a fun and educational project that combines science, technology, art, and engineering!
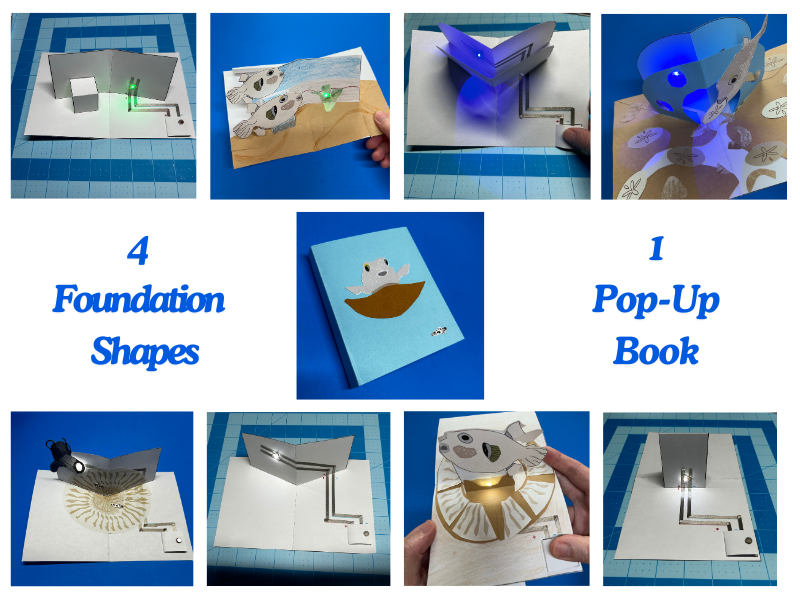
This blog post will show you a way to combine paper circuits with a series of pop-up foundation shapes. Individually, each mechanism may be customized to stand alone. When connected with a simple hinge, they may be combined to create a light-up pop-up book!
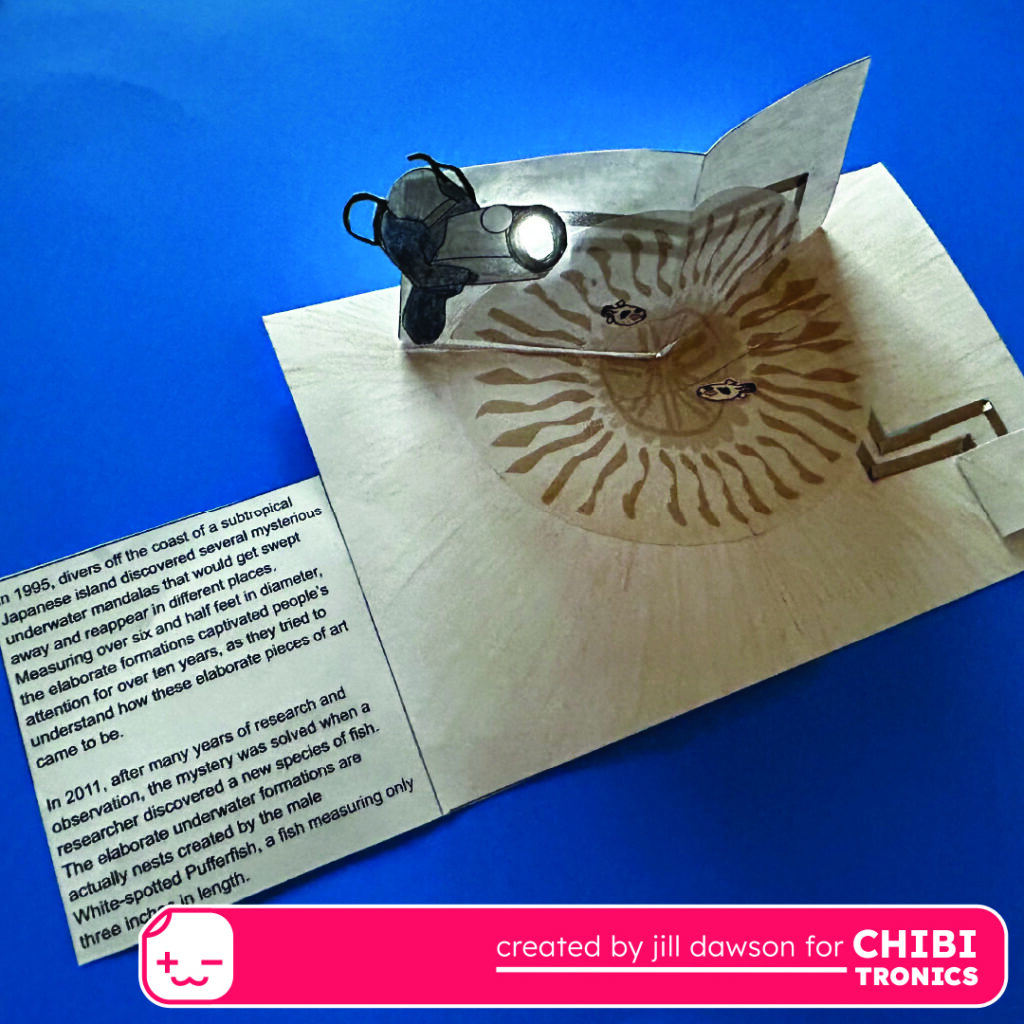
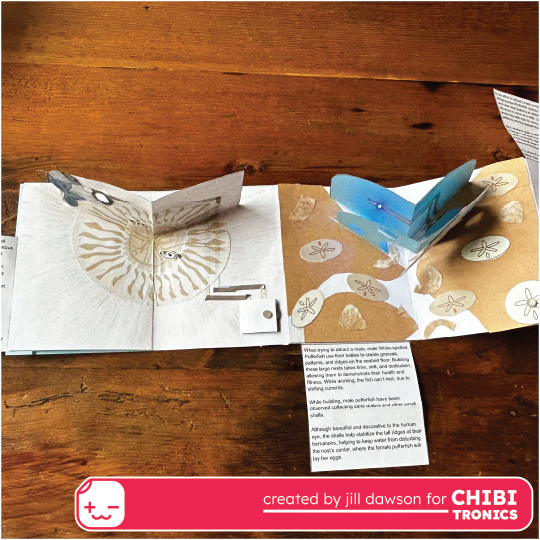
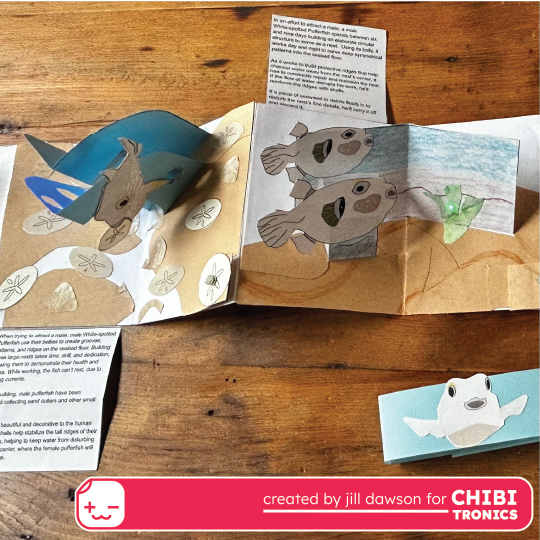
Although easy to make, each structure is versatile, customizable, and equipped with features that make it useful for telling a story or illustrating a concept. For the purpose of demonstration, the models in this project are based upon facts learned about the White-Spotted Pufferfish, a tiny fish recently discovered to be the architect of large, elaborately detailed, symmetrical nests!
…probably the greatest artist of the animal kingdom.
– Sir David Attenborough
Describing the White-Spotted Pufferfish in video episode five of the BBC One Series, Courtship: Life Story

Pop-Ups with Personality!
Each of these basic pop-up mechanisms may be applied in a variety of ways, in different content areas, lending themselves to different types of scenes.
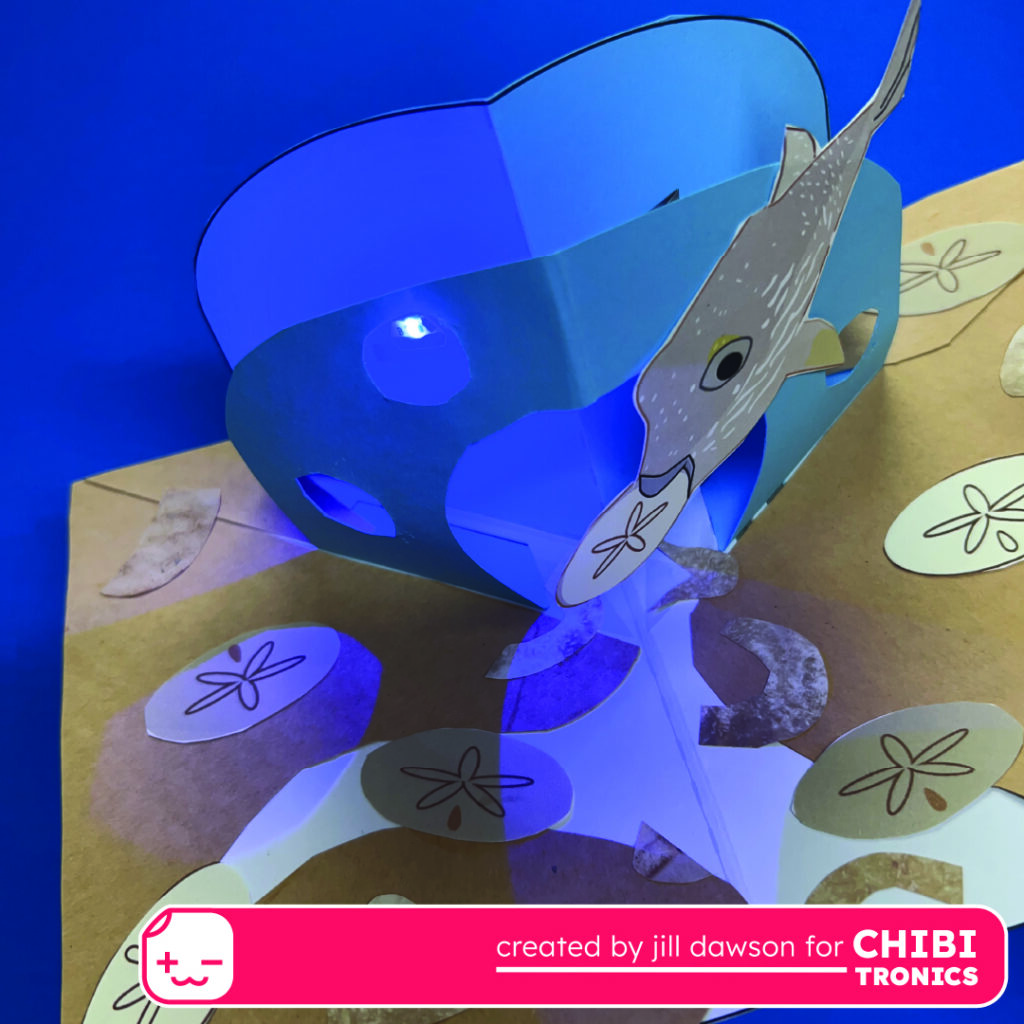
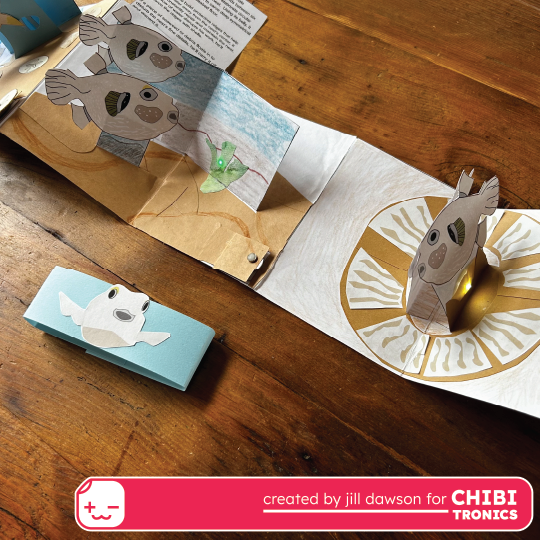
- Parallel Fold: Showcases a pufferfish from two different angles!
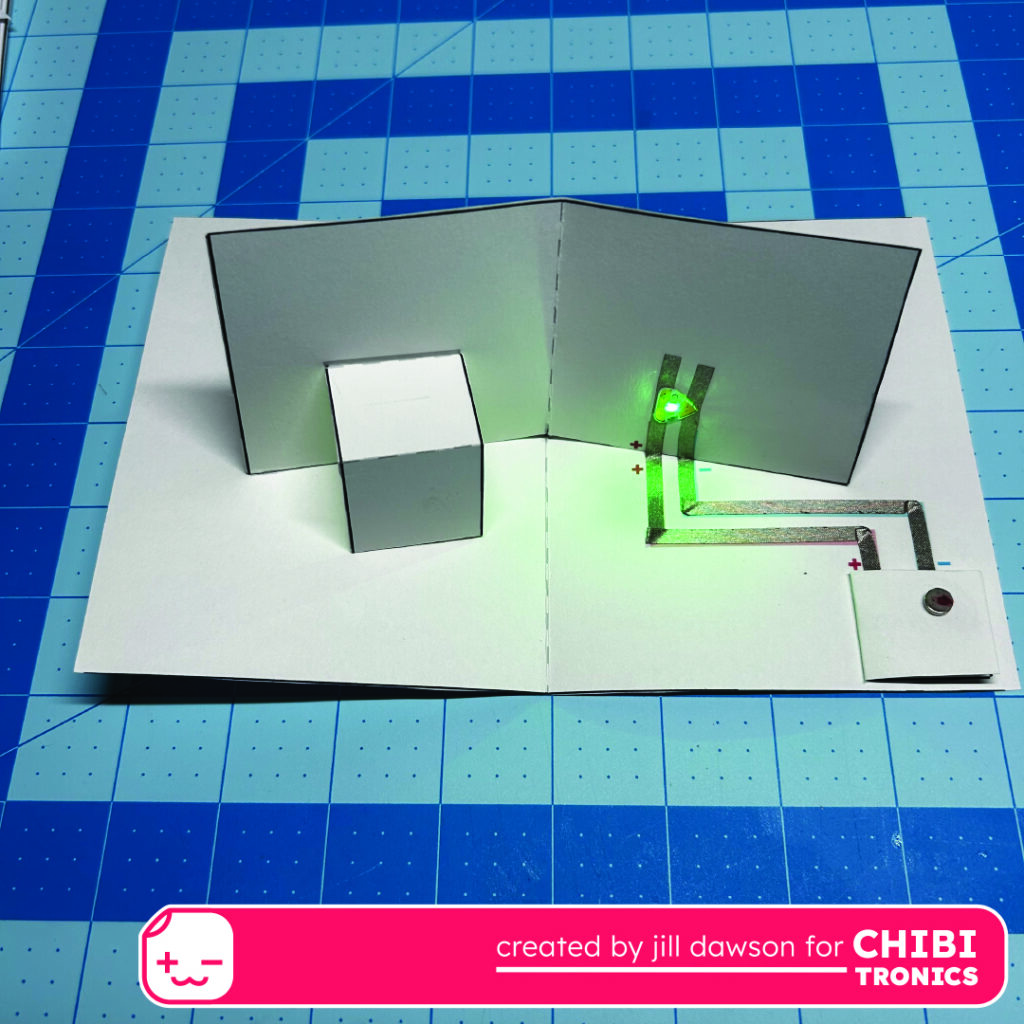
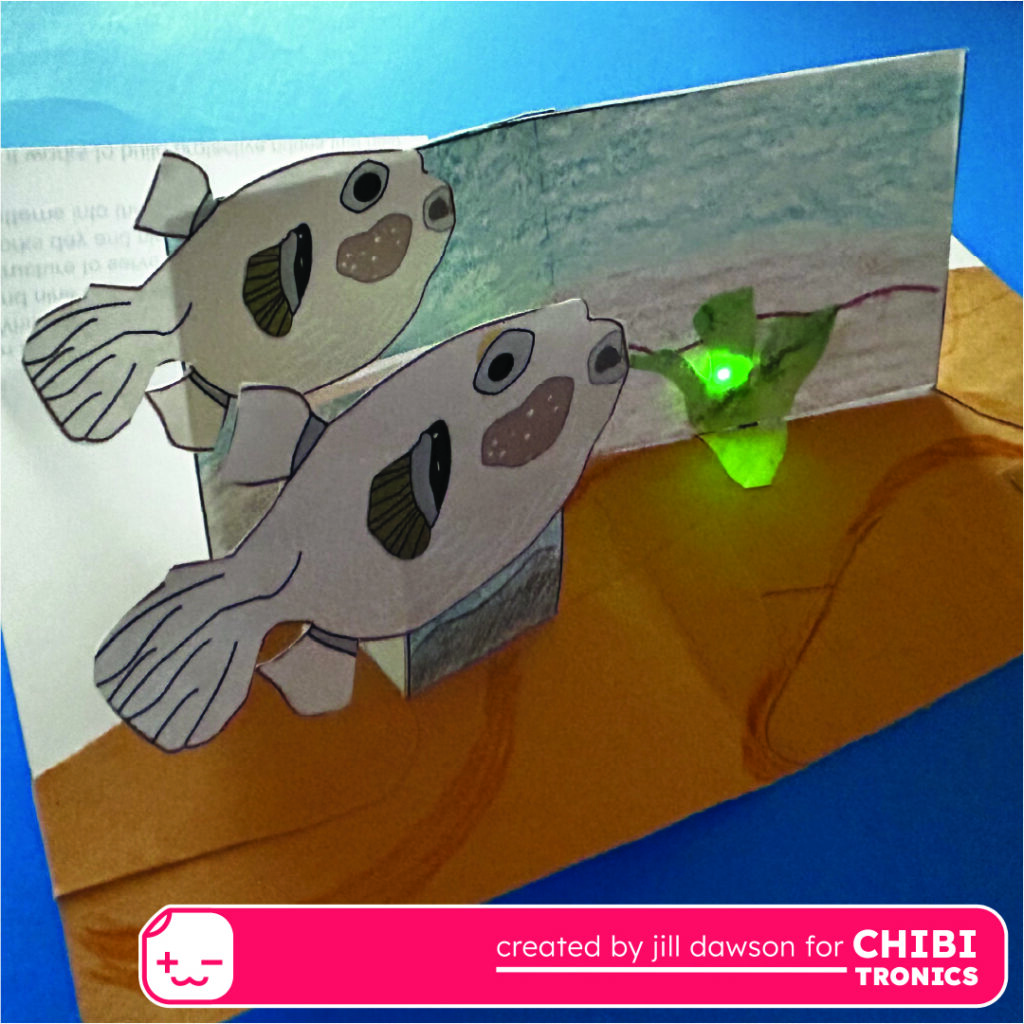
- Simple V-Fold : Creates a 3D scene of two pufferfish side by side.
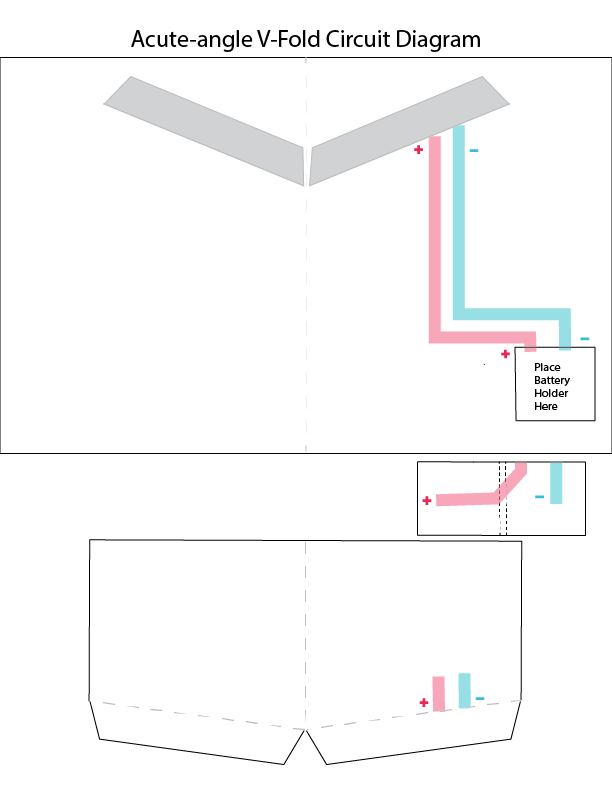
- Acute V-Fold: Reveals a deep-sea diver encountering the pufferfish.
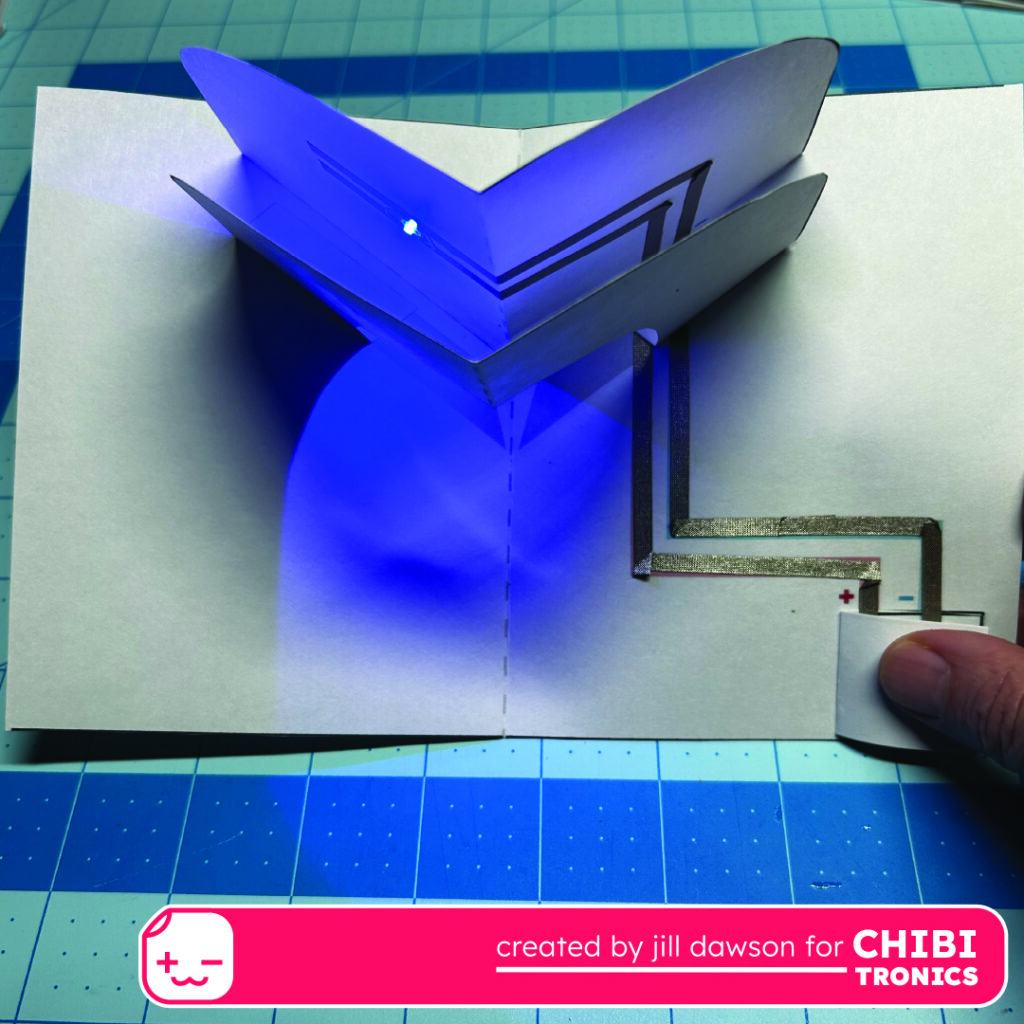
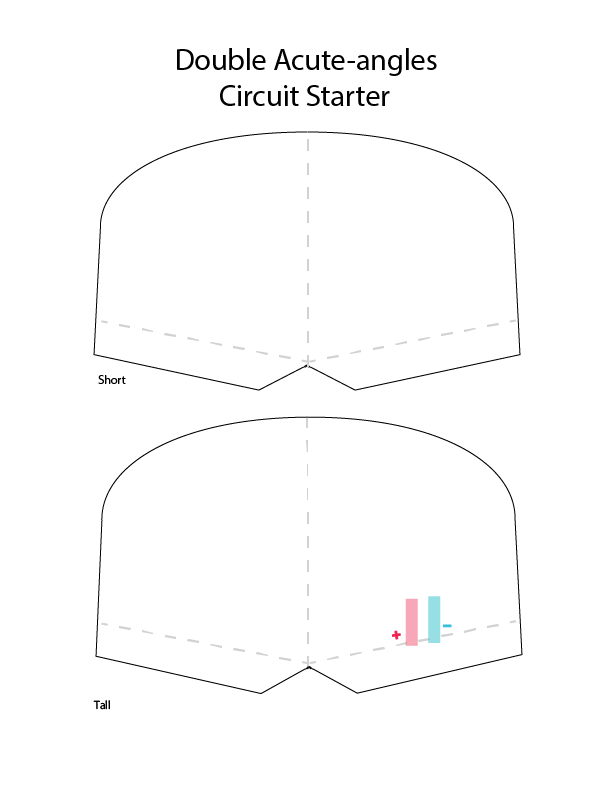
- Double Acute V-Fold: Designs a scene with the pufferfish gathering shells for its nest.
- Pop Up Book: Combines the four scenes into a light-up, pop-up book.
Ready to Dive In?
To help you get started, I’ve provided downloadable templates for each foundation shape and video demos to help make this project accessible.
Useful Tools and Supplies are listed here. A list of suggested steps may be found here.
An idea for combining the pop-up pages into a pop-up book are here.
Suggested Steps:
Tip: If working with students, it’s a good idea to have them first build a dummy model to help them plan out their circuits and designs. Each of the templates with circuit diagrams feature circuits that have been started (but not completed) to make them easier to customize. In some cases, it may be helpful to mark the locations for the LED stickers (and lay down some of the conductive traces) before fully assembling the pop-up.
1. Print out the templates. These may be used to build upon directly or as a guide.
2. Score the dashed lines and cut out the outlined pieces. Crease the scored lines well.
3. Adhere the battery holder template (or substitute your own, if you prefer).
4. Glue the pop-up parts together using the following process.
When gluing V-folds, put glue on one tab and adhere its matching footprint on the template. Next, fold the pop-up piece into its closed position. Then, add glue to the second tab. Carefully close the page. Even if the pop-up doesn’t perfectly line up with the guides on the template, the piece should find its natural position. This method also applies when gluing a shape with more than one layer.
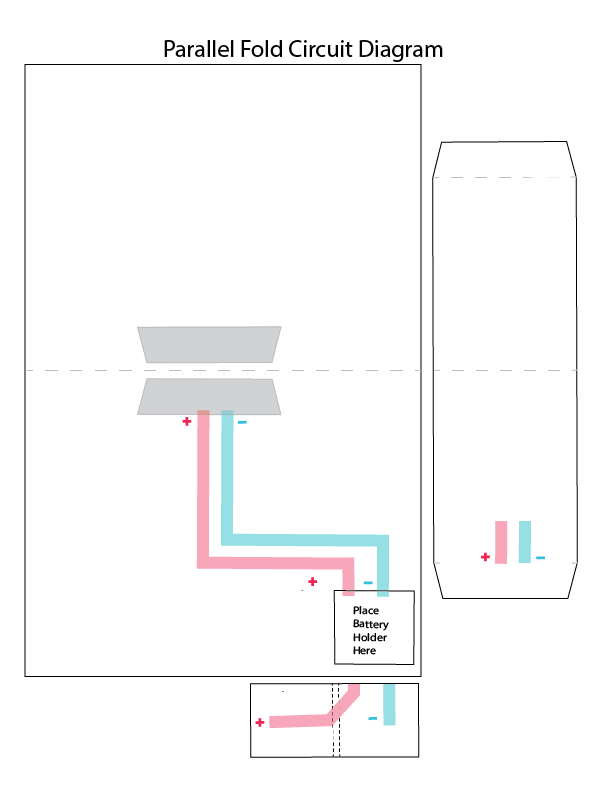
When gluing Parallel folds, put glue on one tab and adhere it to the template. Ensure that the tab is parallel with the card’s central crease. Next, fold the pop-up piece into its closed position. Then, add glue to the second tab. Carefully close the page. Even if the pop-up doesn’t perfectly line up with the guides on the template, the piece should find its natural position.
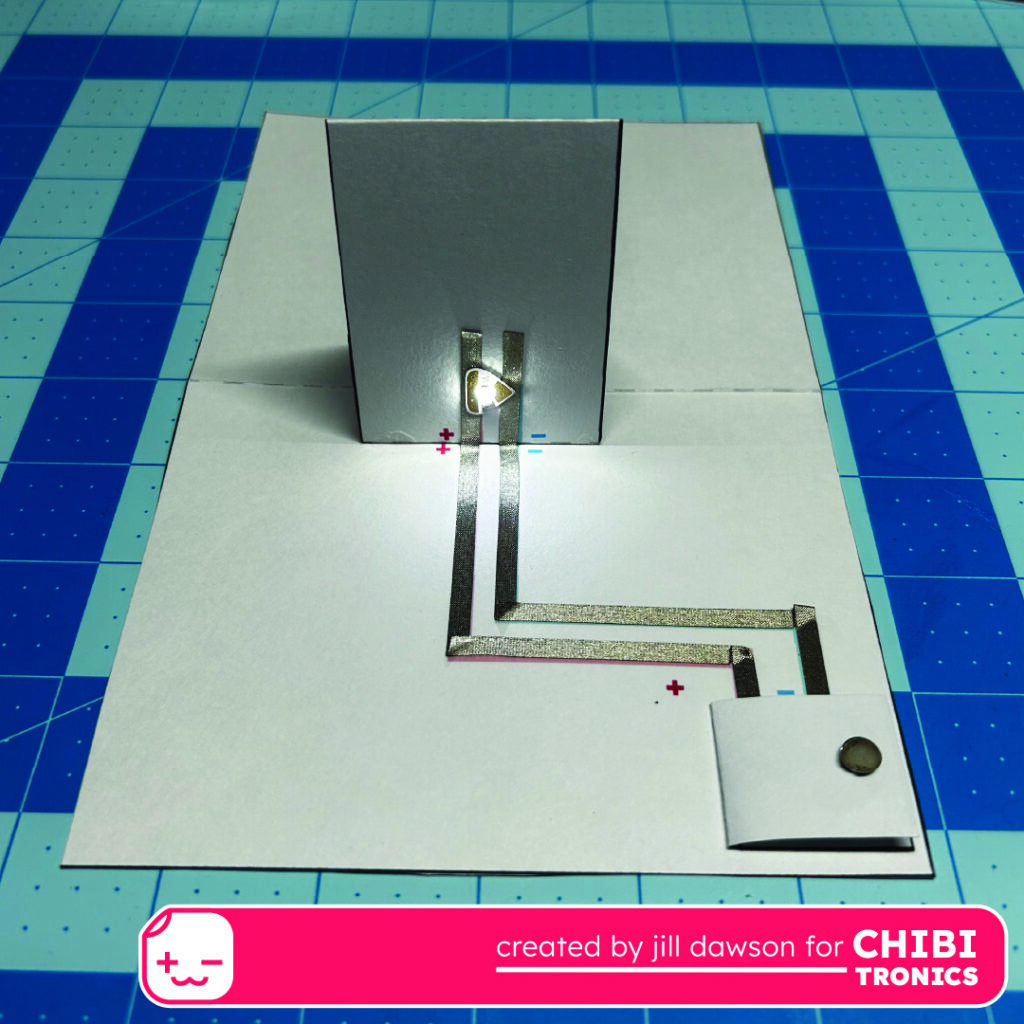
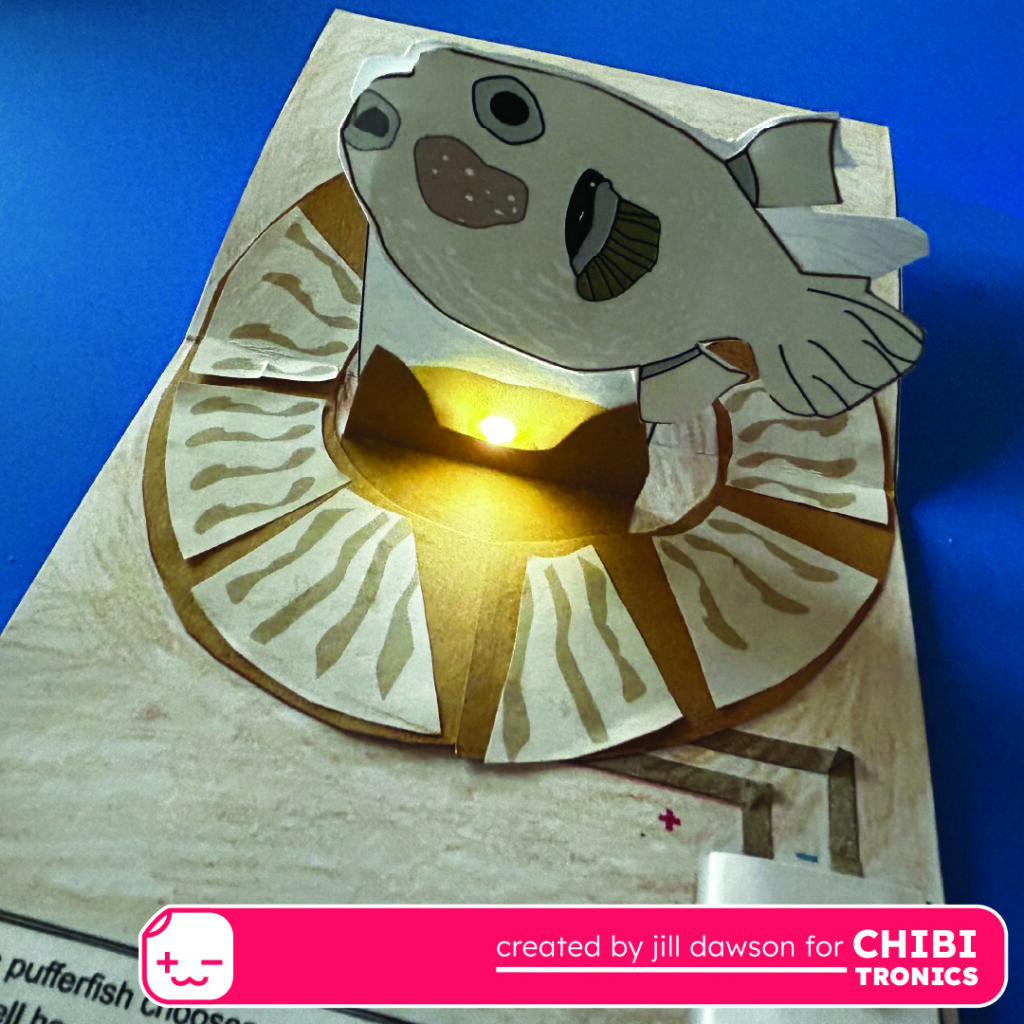
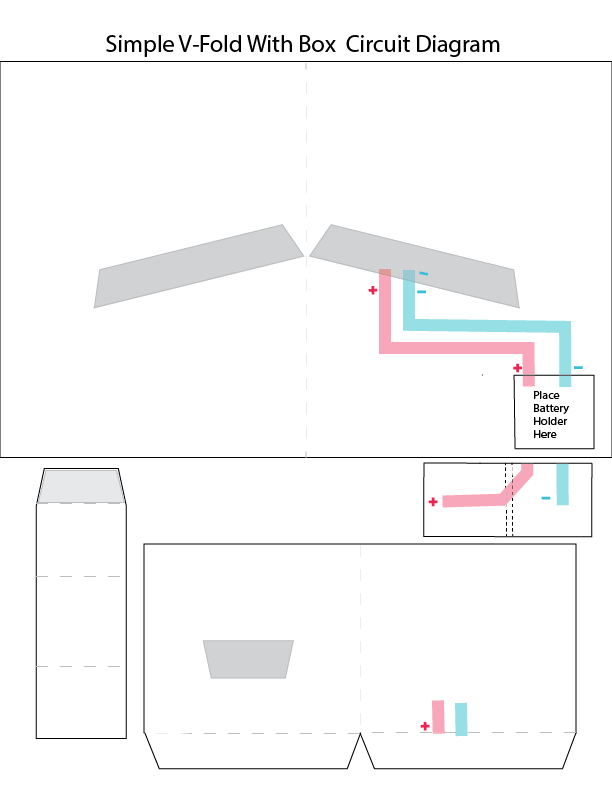
5. Determine the locations for the LEDs and lay down the conductive traces, ensuring that the positive lead on the pop-up connects with the positive lead of the battery holder. Do the same for the negative lead. Apply LED stickers with the broad end touching the positive lead and the pointy, narrow end touching the negative lead.
6. Decorate the pop-up. If desired, disguise the circuit with paper or collage materials.
Templates & Videos
Parallel Fold
The Parallel Fold is considered to be one of the easiest pop-ups to make. It is characterized by a pop with two parallel tabs placed equidistant from a base card’s center crease. Since this structure has two equal sides, it is useful for showing two views of the same object.
Simple V-Fold
The Simple V-Fold points backward when the card is closed, and it is usually placed in the center of a spread. This structure may be used on its own or with extra shapes connected to it, such as a box, which can add extra dimension.
Acute V-Fold
The Acute V-Fold points forward when the card is closed, and it is usually placed near the top of a spread. Since this structure leans backward when the spread is open, it provides a lot of space for creating a scene.

Double Acute V-Fold
The Double Acute V-Fold (with two arched layers) has the same features as the Acute V-fold, but with more potential for detail. Cutting shapes out from (or gluing shapes on top of) the additional layer can help add more complexity.

Useful Tools & Supplies:
- One or more Circuit Sticker LEDs per pop-up
- Conductive Fabric Tape
Tech Tip: If using copper tape to build the circuits, it’s advisable to add patches of Conductive Fabric Tape over the hinged areas, which may crack over time.
- 3V coin cell battery
- Cardstock in colors of your choice (110 pound is ideal, but 65 pound will work)
- Scissors
- A ruler and a scoring tool (a toothpick is useful in a classroom setting)
- Pencil with an eraser
- Hole punch
- Glue or an adhesive of your choice (Wet glues are not the best choice for most pop-ups because the moisture can cause buckling of the paper.)
- Printer
- Art supplies of your choice
- (Optional) Chibitronics Craft Stencil
Bonus!
Connect the pop-ups to create a pop-up book!
Light-Up, Pop-Up Book Model Video
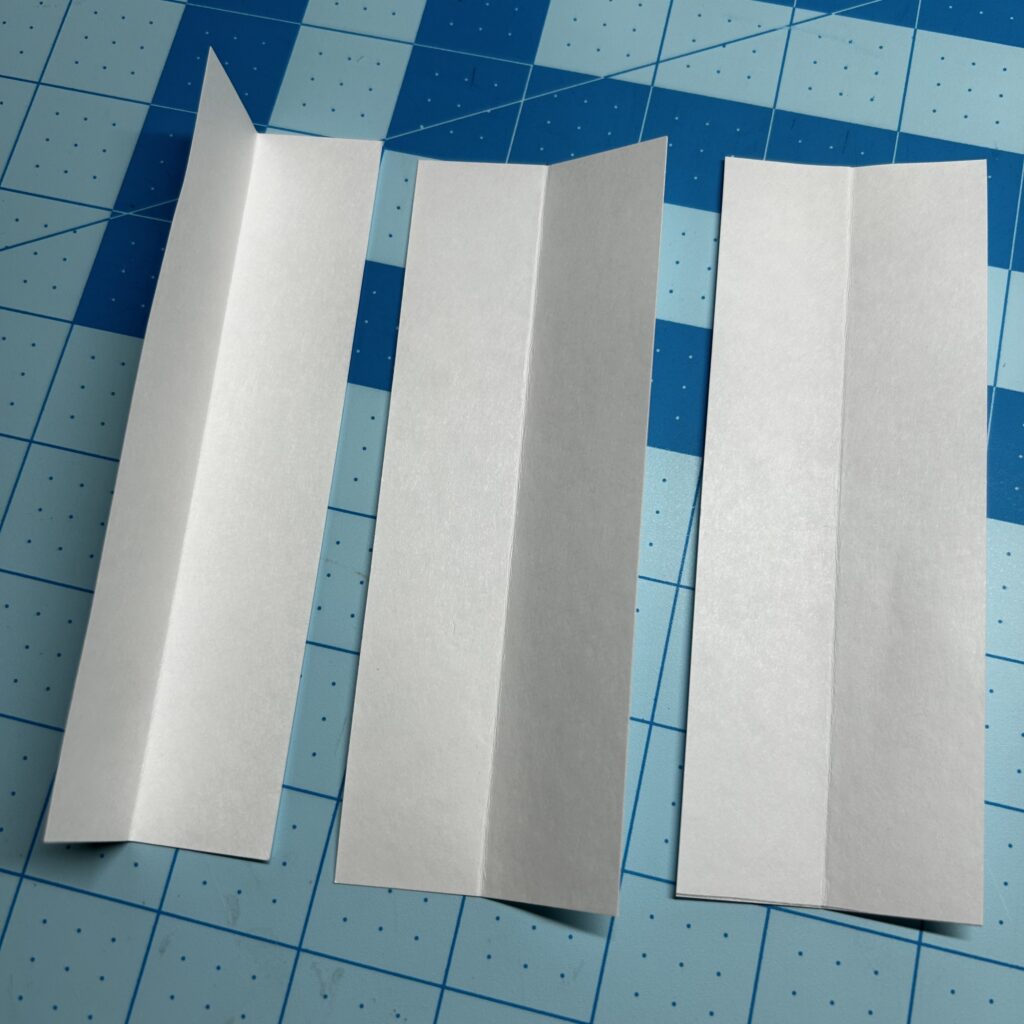
While each foundation shape can stand alone, they may also be connected with simple hinges and turned into a book. Hinges should be the same height as the pop-up spreads. To add them, simply fold strips of cardstock in half, position them as mountain folds, and glue them between each spread. Try to keep the pages on the book’s fore-edge aligned.
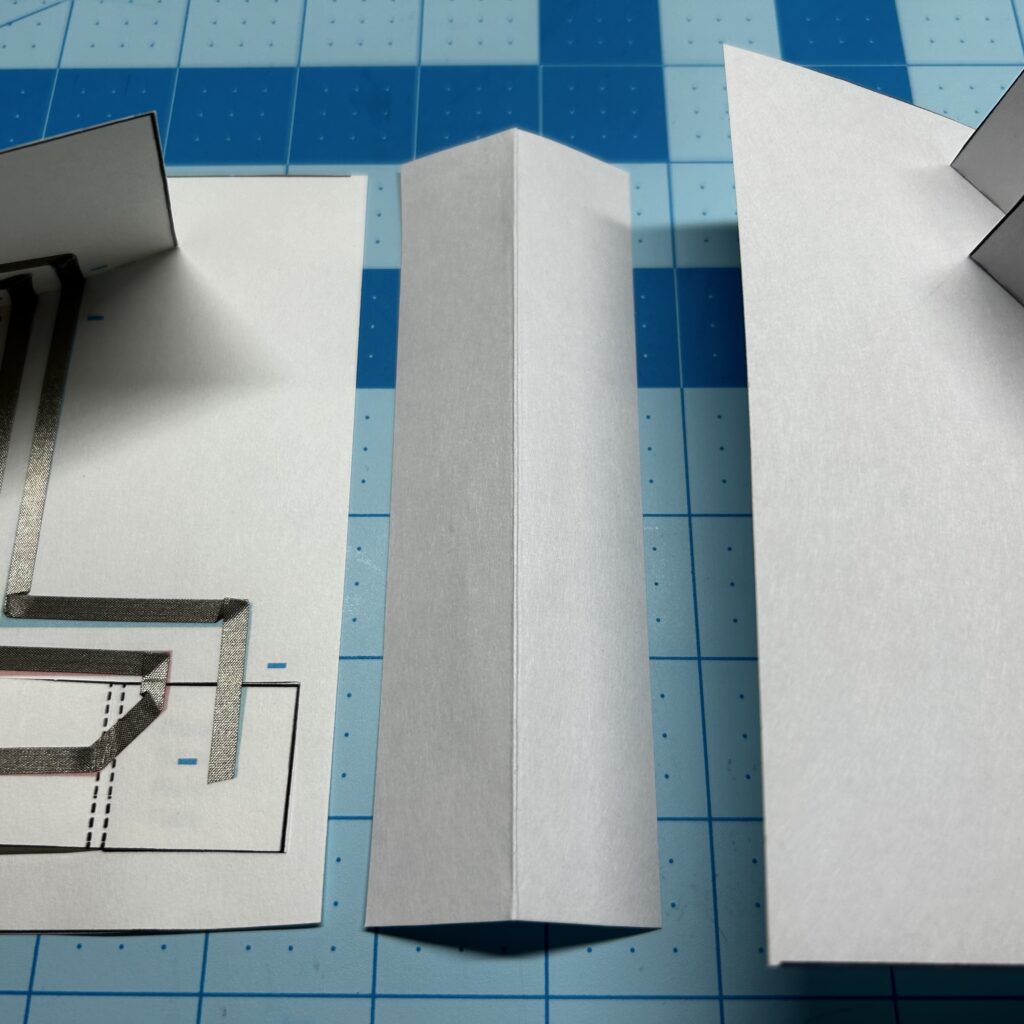
Additional flaps of paper may be added to create room for text.
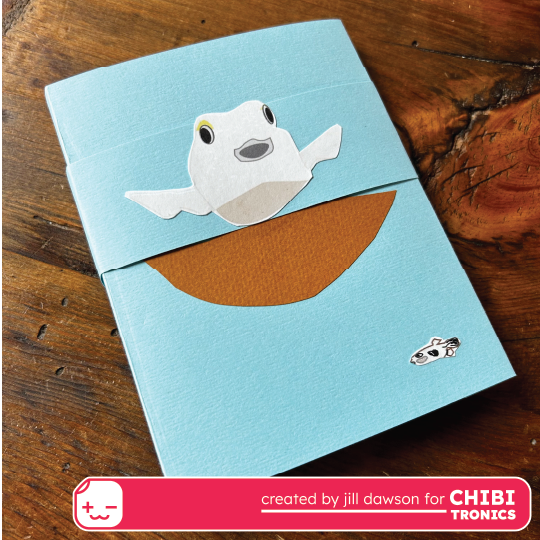
A simple wrap-around cover may be added to keep the pop-up spreads together when they are stored.
How Else Might This Idea Be Applied?
We’d love to hear your ideas!