Create a Light-up Card for a Superstar Teacher!

In anticipation of Teacher Day (May 6) and Teacher Appreciation Week (May 5-9), Chibitronics is shining a light upon the dedicated educators who strive to create engaging, meaningful experiences for their students! 🎉🎉
❤️ To help us celebrate the bright connections made by our hardworking educators, we’ve created a light-up card that you or your child can make and share with a valued teacher.
Let’s show our appreciation with light, creativity, and joy. ✨

Tools & Supplies
Note: The Craft with Light Kit (Color) contains all of the electronics supplies needed for this project.
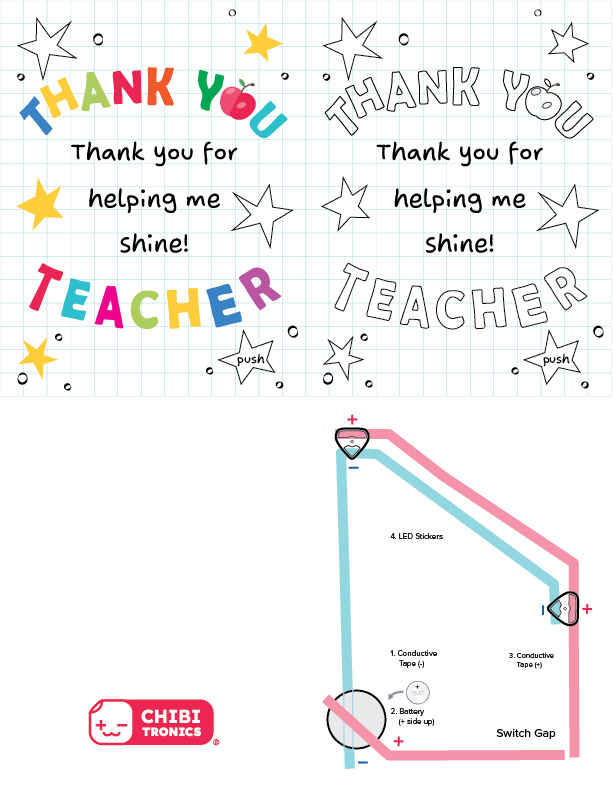
- Thank You Card & Circuit Template (printed on white cardstock)
The top half has two card fronts to choose from: a colored version and one you can color yourself. The bottom half, with the circuit diagram, folds in half) - Two Chibitronics LED Stickers (I used pink and green)
- Conductive Fabric Tape
- 3V Battery
- Scissors
- Foam Tape
- (Optional) Art supplies to personalize the uncolored card front
- (Optional) Hole punch
- (Optional) Glue Stick
- (Optional) Vellum or tissue paper to diffuse the light
Directions
- Download and print the Thank You Card & Circuit Template onto white cardstock.
- Use scissors to cut off the bottom half (which will fold in half to create the card base).
- Separate the card fronts and choose the one you prefer (colored or DIY). If opting for the DIY card front, use art supplies of your choice to add color.
- Stick conductive tape over the blue line on the Circuit Template to create your negative trace.
- Create a tape ball to adhere the battery (negative side down) over the round footprint.
- Stick conductive tape over the pink lines to create the positive traces and be sure to leave a gap for the switch.
- Apply LED Stickers.
- Test the circuit with a scrap of Conductive Fabric Tape, by temporarily pressing it over the switch gap. Your light should turn on when you close the gap!
- Flip the card front over and add a couple pieces of Conductive Fabric Tape to the back left corner (behind the star labeled “Push”) to close the gap in the circuit when the card front is applied.
- Add foam tape around the edge of the card to hold the card front in place.
- (Optional) Punch holes for the LEDs to shine through.
- (Optional) Glue vellum or tissue paper behind the holes.
- Adhere the card front on top of the circuit.
Chibitronics Celebrates Teachers During Teacher Appreciation Week!