Thank a Superstar Teacher!


Teacher Appreciation Week (May 4-8, 2026)
In anticipation of Teacher Day (May 5), Chibitronics is shining a light upon the dedicated educators who brighten their students’ days! ✨
❤️ To help us celebrate our fun-loving educators, we’re sharing a light-up pop-up card that you (or your child) can make and share with a valued educator or coach.
Starting this week, we are also introducing free shipping on all US orders over $100 from our shop (no code required)! (Offer does not apply to email PO’s or Amazon purchases).


Downloadable Card Parts
Tools & Supplies
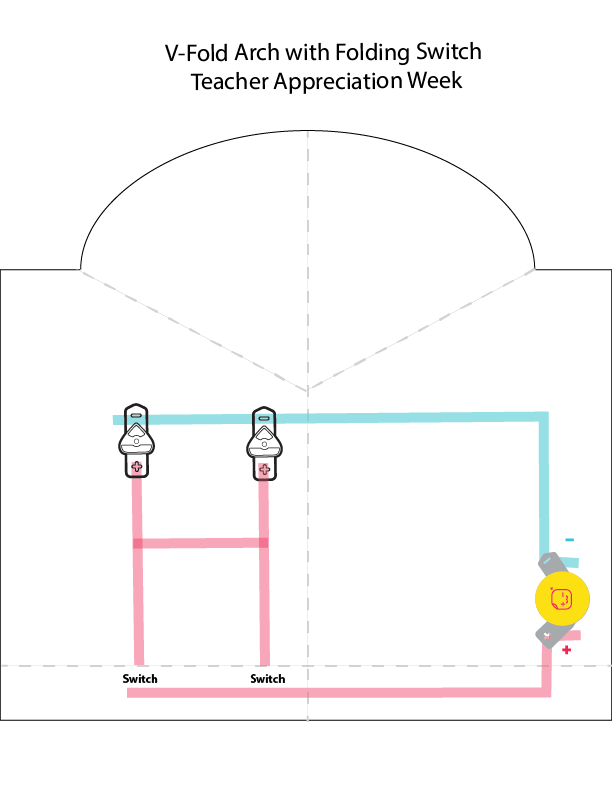
- Card Parts (Teacher Appreciation Day Card Covers, Artwork Layer, and Circuit Diagram) printed on white cardstock)
You can choose the card cover design of your choice. - Two Launchpad LEDs or Circuit Sticker LEDs in a color of your choice.
- Conductive Fabric Tape Spool or Strips
- 1 x Launchpad Battery
- Scissors
- Foam Tape
- Double-Sided Tape (or a Glue Stick)
- Bone Folder
- Ruler
- (Optional) Hole punch (If you want to make holes for the lights to shine through)
- (Optional) Vellum or tissue paper to diffuse the light
Note: This project may be made with Launchpad LEDs or Circuit Sticker LEDs. If using Circuit Sticker LEDs, extend the Conductive Fabric Tape on the Circuit Diagram to ensure that it makes contact with the metal pads of the stickers.
Watch the video for a full demonstration
Directions
- Download and print the Card Parts onto white cardstock.
- Use scissors to cut the card covers apart and set them aside.
- Fold the Art Layer and Circuit Diagram in half. Use a ruler and a bone folder to score the dashed lines and crease the folds. Cut along the solid lines.
- Nest the Art Layer inside of the Circuit Diagram and fold them together. Crease well.
- Open and separate the two layers. Apply double-sided tape to the outside of the folding flap of the Circuit Layer and adhere the Art Layer on top of it (see video for a full demonstration).
- Adhere conductive tape to the blue and red footprints on the Circuit Diagram. Follow the template to ensure that you leave a gap for the switch. If using Circuit Sticker LEDs, extend the conductive tape into the triangular area where the LED Stickers will be placed.
- Secure the Launchpad Battery with conductive tape.
- Secure the Launchpad LEDs over their foot prints with conductive tape or adhere the Circuit Sticker LEDs directly on top of the conductive traces.
- Add small pieces of foam tape to either side of the switch gap.
- (Optional) Punch holes for the LEDs to shine through.
- (Optional) Glue vellum or tissue paper behind the holes. to diffuse the light.
- Fold the card cover of your choice in half. Apply double-sided tape to the inner edge of the card cover. Nestle the folded card into the crease.
Chibitronics Celebrates Teachers With a Light-Up Pop-Up Card!