
Research a Place: Tell Its Story with Pop-Ups and Paper Circuits

In this post, I’ll share a way to combine paper circuits with a series of pop-up foundation shapes that may be used as a three-dimensional travel journal. Individually, each mechanism can stand alone. However, each structure may also be combined to create a light-up pop-up book!
Easy to make (with a little practice) each pop-up is versatile, adaptable, and suited for telling a story or illustrating a concept. For the purpose of demonstration, the models I’m sharing document my travels in New Brunswick, Canada!
While I’ve illustrated this book by combining collage, original artwork made in Adobe Illustrator, and a handful of Public Domain images, this project may be easily adapted.
Watch Video Overview
Place-Based Pop-Ups Record Memories and Tell Stories!
While I’m focusing upon places I’ve visited, each of these basic pop-up mechanisms may be applied in a variety of ways, in different content areas, lending themselves to many types of scenes.
- Parallel Fold: Showcases elements of the provincial flag, coat of arms, and a map of NB.
- Simple V-Fold: Reveals the provincial flower (Wild Violet) and bird (Chickadee) of NB.
- Acute V-Fold: Documents the world’s largest axe (in Nackawic) and longest covered bridge (in Hartland)!
- Acute V-Fold with Tall Arch (or Double Arches): Explores the St. Martins Sea Caves and bird migration in the mud flats of Shepady Bay/ Dorchester (in the Bay of Fundy).
- Pop Up Book: Combines the scenes into a light-up, pop-up book about notable attractions in New Brunswick, Canada.
Prepare for Your Journey
To help you get started, I’ve provided downloadable templates for each foundation shape, links to projects in Circuit Sketcher, and video demos to help make this project accessible.
The downloadable templates (see yellow buttons) have Circuit Starters on them, to allow you to manually place your components where you want them.
The Circuit Sketcher Projects (see blue buttons) feature completed circuits that may be used as is, or modified directly in Circuit Sketcher. I’ve used these to make the video demos.
IMPORTANT:
The downloadable templates feature footprints for our safer Launchpad Battery. For templates that use a traditional coin cell battery, please visit this blog post: Make 4 Simple Pop-Ups Glow with Chibitronics LEDs.
Useful Tools and Supplies are listed here. A reference list of suggested steps may be found here.
Tips for combining the pop-up pages into a book are here.
Templates & Video Tutorials
Parallel Fold with a Switch
Parallel Fold with a Switch Video
The Parallel Fold is considered to be one of the easiest pop-ups to make. It is characterized by a pop with two parallel tabs placed equidistant from a base card’s center crease. Since this structure has two equal sides, it is useful for showing two views of the same object.


Simple V-Fold with a Box & Switch
Simple V-Fold with a Box & Switch Video
The Simple V-Fold points backward when the card is closed, and it is usually placed in the center of a spread. This structure may be used on its own or with extra shapes connected to it, such as a box, which can add extra dimension.


Acute V-Fold with a Switch
Acute V-Fold with a Switch Video
The Acute V-Fold points forward when the card is closed, and it is usually placed near the top of a spread. Since this structure leans backward when the spread is open, it provides a lot of space for creating a scene. It can be adapted by adding a box, which allows extra layering and detail.


Acute Angle V-Fold with a Tall Arch and Switch
Acute Angle V-Fold with a Tall Arch and Switch Video
The Acute Angle V-Fold with a Tall Arch has the same features as the Acute V-Fold, but with more potential for detail due to its height. An optional box or arch may be added (and a circuit can even be extended onto those pieces). Cutting shapes out from (or gluing shapes on top of) additional layers can help add complexity.


Useful Tools & Supplies:
- One or more Circuit Sticker or Launchpad LEDs per pop-up spread
- Conductive Fabric Tape
Tech Tip: Conductive Fabric Tape is best for making hinges. If using copper tape to build the circuits, it’s advisable to add patches of Conductive Fabric Tape over the hinged areas. Otherwise, they may crack over time.
- 1 X Launchpad Battery (or 3V coin cell battery) per spread
- Cardstock in colors of your choice (65 pound works well)
- Scissors
- A ruler and a scoring tool (a toothpick is useful in a classroom setting)
- Pencil with an eraser
- Hole punch
- Glue or an adhesive of your choice (Wet glues are not the best choice for most pop-ups because the moisture can cause buckling of the paper.)
- Printer
- Art supplies of your choice
- (Optional) Chibi Stencil
Suggested Order for Steps:
Tip: If you’re new to building pop-ups, it’s a good idea to build a dummy models to practice making each pop-up mechanism. To find completed circuit diagrams that match the video tutorials, visit the related Project Pages in Circuit Sketcher, marked with blue buttons. Each of the Circuit Starter templates feature circuit diagrams that have been started (but not completed) to make them easier to customize.
In some cases, it may be helpful to mark the locations for the LEDs (and lay down some of the conductive traces) before fully assembling the pop-up.
1. Print out the templates. These may be used to build upon directly or as a guide.
2. Score the dashed lines and cut out the outlined pieces. Crease the scored lines well.
3. Glue the pop-up parts together using the following process:
a. When gluing V-folds, put glue on one tab and adhere its matching footprint on the template. Next, fold the pop-up piece into its closed position. Then, add glue to the second tab. Carefully close the page. Even if the pop-up doesn’t perfectly line up with the guides on the template, the piece should find its natural position. This method also applies when gluing a shape with more than one layer.
b. When gluing Parallel folds, put glue on one tab and adhere it to the template. Ensure that the tab is parallel with the card’s central crease. Next, fold the pop-up piece into its closed position. Then, add glue to the second tab. Carefully close the page. Even if the pop-up doesn’t perfectly line up with the guides on the template, the piece should find its natural position.
4. If using a Circuit Starter, mark the locations for the LEDs and lay down the conductive traces, ensuring that the positive lead on the pop-up connects with the positive lead of the battery Do the same for the negative lead. Apply LED stickers with the broad end touching the positive lead and the pointy, narrow end touching the negative lead.
5. Decorate the pop-up. If desired, disguise the circuit with paper or collage materials.
Optional
Connect the spreads to create a pop-up book!
While each foundation shape can stand alone, they may also be connected with simple hinges and turned into a book.


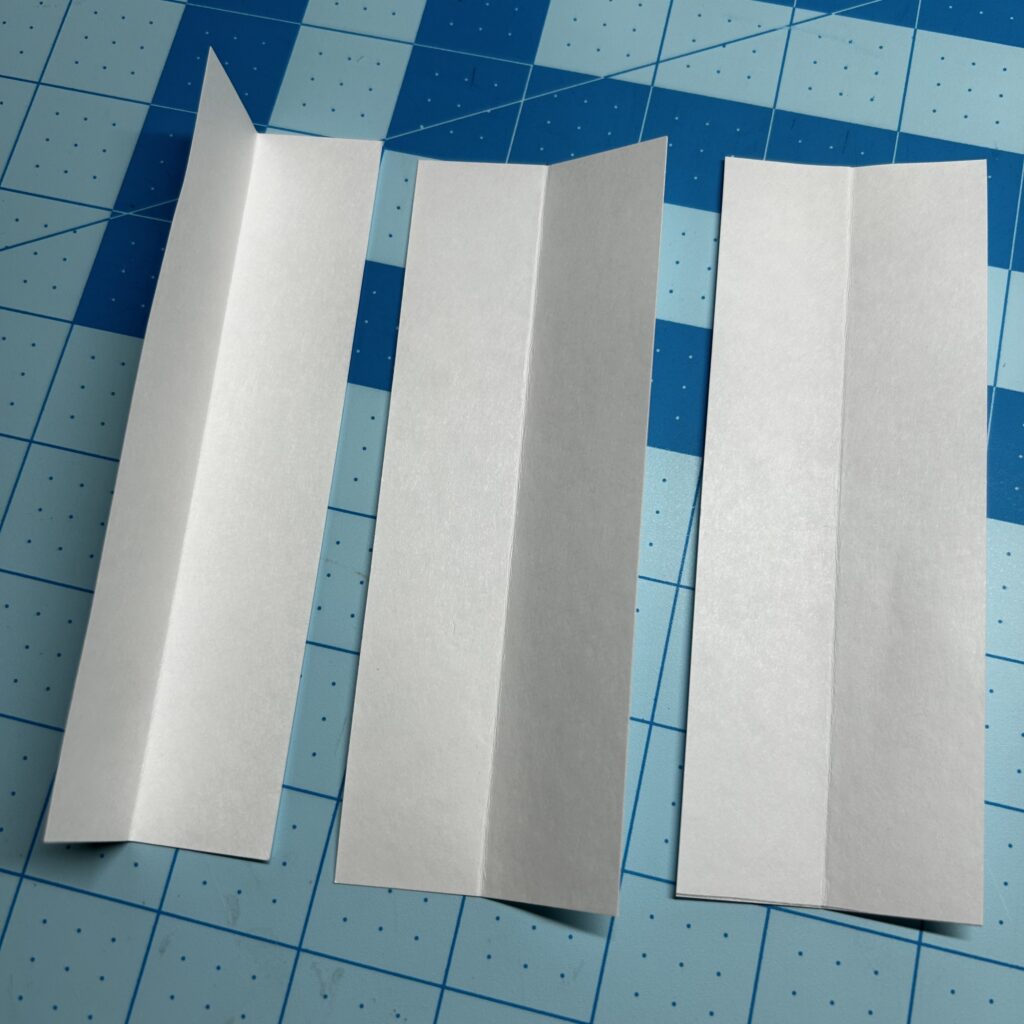
Hinges should be the same height as the pop-up spreads. To add them, fold strips of cardstock in half, position them as mountain folds, and glue them between each spread. Try to keep the pages on the book’s fore-edge aligned.

Additional flaps of paper may be added to your pop-up spreads to create room for text.
A simple wrap-around cover may be added to keep the pop-ups together when they are stored.