Hi everyone! Nicorin is here. I’ve just returned to Japan today.
I’m so excited to live in Japan again and missed New England life, the beautiful nature, and friends, both feeling in mixed-in portion now.
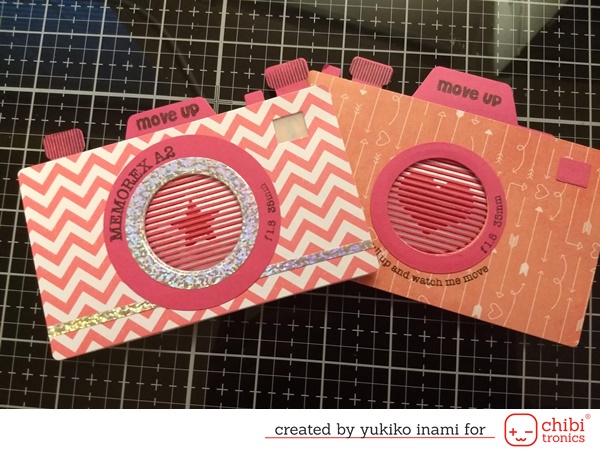
Leaving that aside, I show an interactive camera for you.
When you pull the top tag, the star image is twinkling and the light flashing!
The intricate grid and special stamp image can make this amazing motion. I combined the motion of the pull tab and the switch. It’s so fun. I could not stop pulling and pushing.
Supplies
・A2 Camera Stamp and Die Cut Kit Motion Crafts
・Pattern Papers and Color Papers
・White Card Stock for the circuit panel
・White Vellum Paper; thick
・White LEDs MegaPack (30 stickers)
・Copper Tape
・3V Coin Battery
・Foam Tape
How to make
1.Prepare the parts
・Die cut the color paper with grid die and pattern paper with camera die.
・Circle die can make a lens.
・Die cut the white card stock with the camera die for the circuit panel.
・Stamp the word around the lens and the pull tab of the grid.
・Stick the vellum paper on the backside of the camera panel. Stick the lens parts on the camera panel.
2. Draw the Circuit
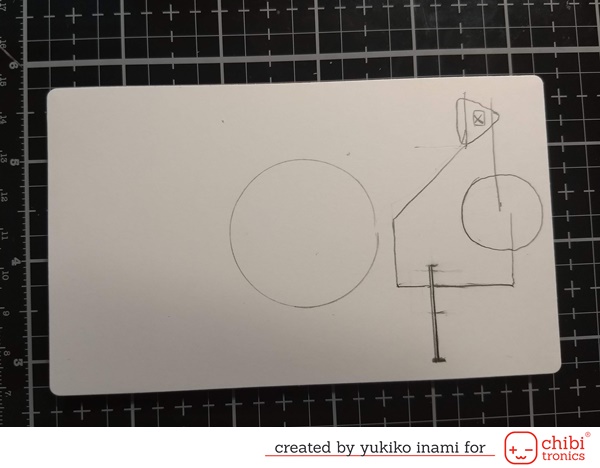
・Draw a circuit on the circuit panel.
・Mark the place of the battery.
・Make a slit for the switch :
Slit Position; 1/4 inch from the under the edge and between the right edge and circle hole
Direction; vertical
Slit Size 1/16 inch width, 1-inch length
・Put the switch part in the slit and slide to the upper edge and mark the connecting path with the circuit.
3.Make the circuit
・Stick the copper tape on the drown path.
・Peel off the release paper on the Battery place then stick the negative path copper tape start from the marking of LED negative pad to the negative side of the battery.
・Place the battery on the copper tape with the positive side up.
・Stick the copper tape on the positive path from the backside go through the slit and the positive side of the battery.
・Stick the copper tape from the backside goes through the slit to the LED positive pad mark.
・Then put the LED stickers on the mark.
・Put the switch in the slit and test the switching work well.
・After you confirm that the lights work well when the slit switch slide in the place, reinforce the connection of LED stickers and copper tape path with sticking the short copper tape on each edge of LED stickers.
4.Assembly
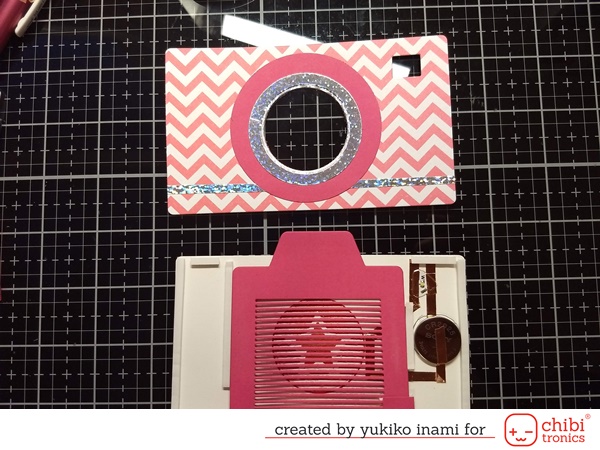
・Set the grid panel on the circuit panel.
・Stick the foam tape around the grid panel making a rim for the sliding rale.
・Stick the foam tape around the circuit paner except the upper edge of grid panel.
・Slide up the grid panel. This position is for the switch on, so set the switch at the light on position.
・Then stick the switch on the back side of the insert panel.
1) Slide the grid panel to the top position.
2) The grid panel moves to the top side of the slit confirming that light on.
3) Stick the double sided tape on the switch parts backside
4) Peel off the release paper of the switch part and foam tape.
5) Make sure that the grid panel in just good place, parallel and not sticking in the foam tape
6) Stick the camera panel on the circuit panel
I did it!
You can make many types of interactive light-up project with pull tabs switch system. We made pull tab switch, peek a boo, shadow box cards double slider, and so on. If you want to light up some interactive card, you may look for the place where sliding and you can use the slit switch on there, then you can make the project light-up with a switch.
Have fun!
Thank you for stopping by! Nicorin( Yukiko I.)
I love this card! I thought it was cool before you made it light up. Now I love it even more