
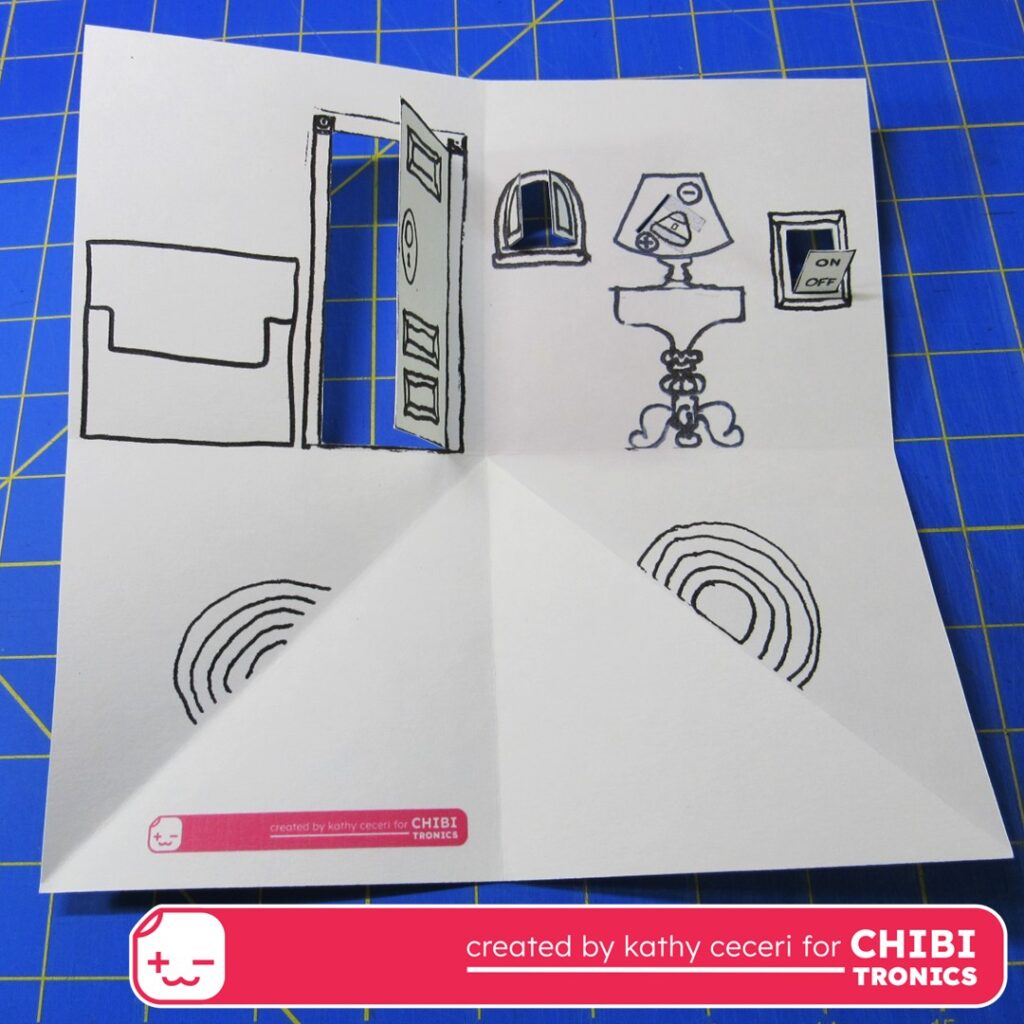
Hi! It’s Kathy Ceceri with a fun idea that lets you turn a piece of paper into a dollhouse-sized room. The Paper Corner Room folds up like a card. Connect multiple rooms to create a book that opens up to reveal an entire house. Of course, the best part is adding Chibitronics LED stickers to make the lights in the house glow!
The template I created here includes a pop-up couch and a half-round table. On the table, a lamp with a pleated shade uses a Chibitronics LED sticker to light up the room when you flick the wall switch. The circuit connecting the LED and the switch goes on the back side of the wall, where it can be hidden behind the wall of an adjoining room or exterior “siding.” Lower down, I give you some tips for designing your own rooms, furniture, and switches.

(For a quick and easy kids’ version, I recommend the free instructions from Dazzling Discoveries. Thanks to Godwyn Morris for sharing this idea with me!)
To build the room from the template:

TEMPLATE NOTE: Lines with dashes means fold back (mountain fold). Lines with dots means fold towards you (valley folds).
- Cut off the strip with the furniture and save it for later. Don’t color in anything yet.
- Lay the room part of the template down in front of you sideways, so the righthand side of the room (with the lamp) is at the top.
- Fold the template in half side to side and make a sharp crease. Unfold.
- Fold the top half down so it meets the bottom edge. Then, with the fold at the top, take the top right corner and bring it down diagonally so it meets the bottom edge at the center crease. Unfold just the diagonal crease. Flip the whole thing over over, and fold the diagonal crease again in the opposite direction.
- Open your room flat again. Now’s the time to color in the furnishings.
- Open your room and turn it right side up, with the floor at the bottom. Take the bottom right corner and bring it over to the bottom left corner. The floor will fold over itself and cover the Chibitronics logo. The walls will stand up to form the corner of the room. (If you need to hold the room upright while you’re working, you can paperclip the layers of the floor to hold them flat.)
- Once you’re done coloring, make four cuts in the room:
- Door: Score the dashed line. Cut along the top, bottom, and left edges of the door to let it swing in or out.
- Window: Score the dashed parts of the lines along the curved outer edge to make the hinges for each half. Cut around the rest of each half and down the middle.
- Lamp: Cut out the thick dark line to the left of the LED sticker. Make the opening wide enough to slide conductive tape through. (See circuit instructions below.)
- Wall switch: Score the bottom of the ON/OFF flap. Cut around the top and sides. Fold down as shown. (To let the switch fold down all the way, cut completely off, then tape back on, leaving a tiny space for a hinge.
- Cut another, slightly bigger, flap from some scrap paper. Tape it on the back of the template (the side with the circuit) so it folds over from the side, as shown.
- Cover the inner side of each flap with magnetic sheet. Make sure the magnetic sides face each other.
Add the Circuit:

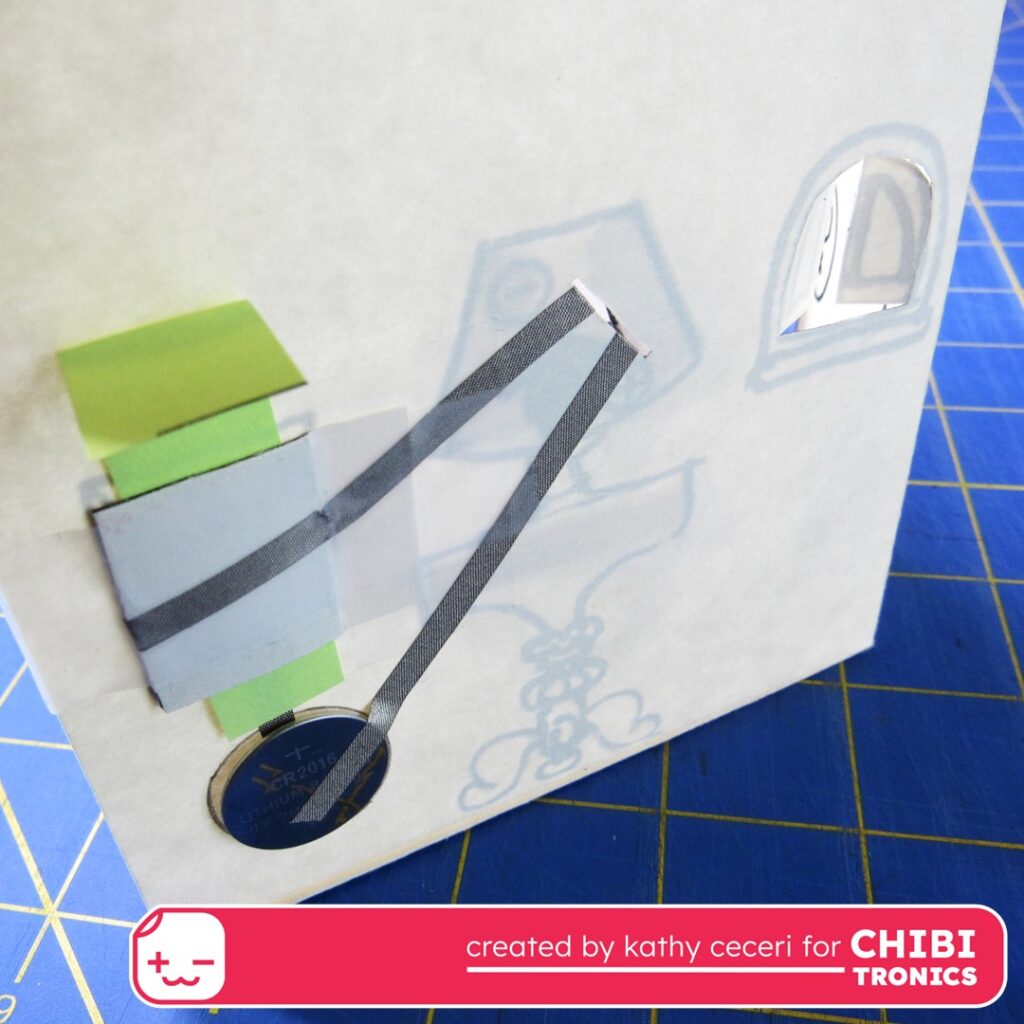
The switch for the LED in the lamp consists of two flaps covered with a magnetic sheet (the same kind of switch I used in my Easter Egg design.) The conductive tape gets folded over the top of each flap, so they can snap together to turn the switch on. Here are the steps:
- On the back of the template, place the battery below the flap you cut for the wall switch. Trace around the battery and remove it.
- For the negative side of the circuit, lay a strip of conductive tape from the spot for the battery to the magnetic sheet on the ON/OFF flap.
- To hold the battery in place, make a loop of the tape, sticky side out. Press the battery down on it, positive (+) side up.
- Next, use another piece of conductive tape to connect the positive side of the battery to the spot for the LED on the front of the template. When you get to the slot you cut near the LED, leave the backing paper on so you can slide it through more easily. Then remove the backing paper and attach the tape where shown.
- The last piece of conductive tape goes from the line marked negative (-) to the second flap. Again, bring the conductive tape up and over the flap. Use regular tape to hold that flap closed tight against the opening between the flaps.
- Press an LED sticker onto the front of the template where shown. Fold the ON/OFF flap up. The lamp should turn on! If the LED doesn’t light up, make sure the two pieces of conductive tape are touching. Some tips:
- Trim the ON/OFF switch if needed to get it to fold all the way in.
- Add another layer of conductive tape (or use a conductive tape patch) to make a better electrical connection if needed.
- To keep the lamp off even when the ON/OFF flap is up, bend the flap down and slide a thin strip of paper under the second flap on the back. Fold the top of the paper strip over so it doesn’t fall out. Pull the strip up when you want the lamp to light.

Assemble the Pop-Up Furniture:

- Couch:
- Cut out the couch and color it in. Score all the dotted and dashed lines.
- For the arms, cut just the inner heavy solid lines. Bend the arms out. Crease them along the dashed lines.Fold all the other dashed lines back (mountain fold). The seat of the couch gets folded in, along the dotted line.
- Tape or glue the edges together to connect the bottom and back of the couch. Use double-sided tape to attach the couch to the template.
- Table:
- Cut out and color the half-round part. Fold the flap back along the dashed line. You can color the underside of the flap to match the table printed on the wall.
- Tape or glue the flap to the template where shown.
- Lampshade:
- Print or trace the lampshade on copy paper or lighter-weight paper.
- Accordion-fold the lines, starting from the middle out.
- Match the edges to the lampshade on the template and tape or glue in place.
DIY Tips:
- To build a room from plain non-square paper:
- Fold the long edges together. Unfold. Then fold the short edges together.
- Fold the diagonal crease as described above.Fold it again along the very first crease, so it forms a square with a little extra sticking out one side. Cut off that extra to make a perfect square.
- Continue as above.
- To make your own 3-dimensional furniture, the only rule to keep in mind is to make sure it doesn’t stick out past the diagonal crease on the floor. Here’s and easy way to create different kinds of furniture for your room:
- Take a strip of paper and fold it three times. Connect the edges and you have a hollow square or rectangle that can be squished flat. Use long shapes as a bed or a couch. A square shape can be a table or a desk.
- You can cut out legs from the front of the hollow shape, or pile on smaller shapes for the arms of a chair or pillows on a bed. The back and the bottom should be taped or glued to the wall and floor.
- You can also attach counters or tables directly to the walls with a crease that lets them fold up or down.
- If you want to attach more rooms to the first, use the first room to see where to put doors or windows into the other rooms.
Supplies
- 3 Pack Chibitronics Conductive Fabric Tape
- White MegaPack (30 LED stickers)
- Conductive Fabric Tape Patches
- Magnetic Sheets with Adhesive Backing (such as this)