Love to Code
Lesson Guide
Overview
Materials, Tools & Templates
Buying Guide
Preparation/Setup
Lessons
Educational Standards
Overview
Grades: Can be adapted for grades 3-12. The lessons below are intended to build skills that students can apply to a larger project goal.
Estimated Time (per lesson): 45 min
Students will learn:
* Programming concepts including variables, conditional statements, loops, and multithreading;
* Techniques for crafting paper electronics elements and circuitry;
* How to program the Chibi Chip, with a Scratch-inspired block code editor by Microsoft MakeCode, or a text coding environment similar to Arduino.
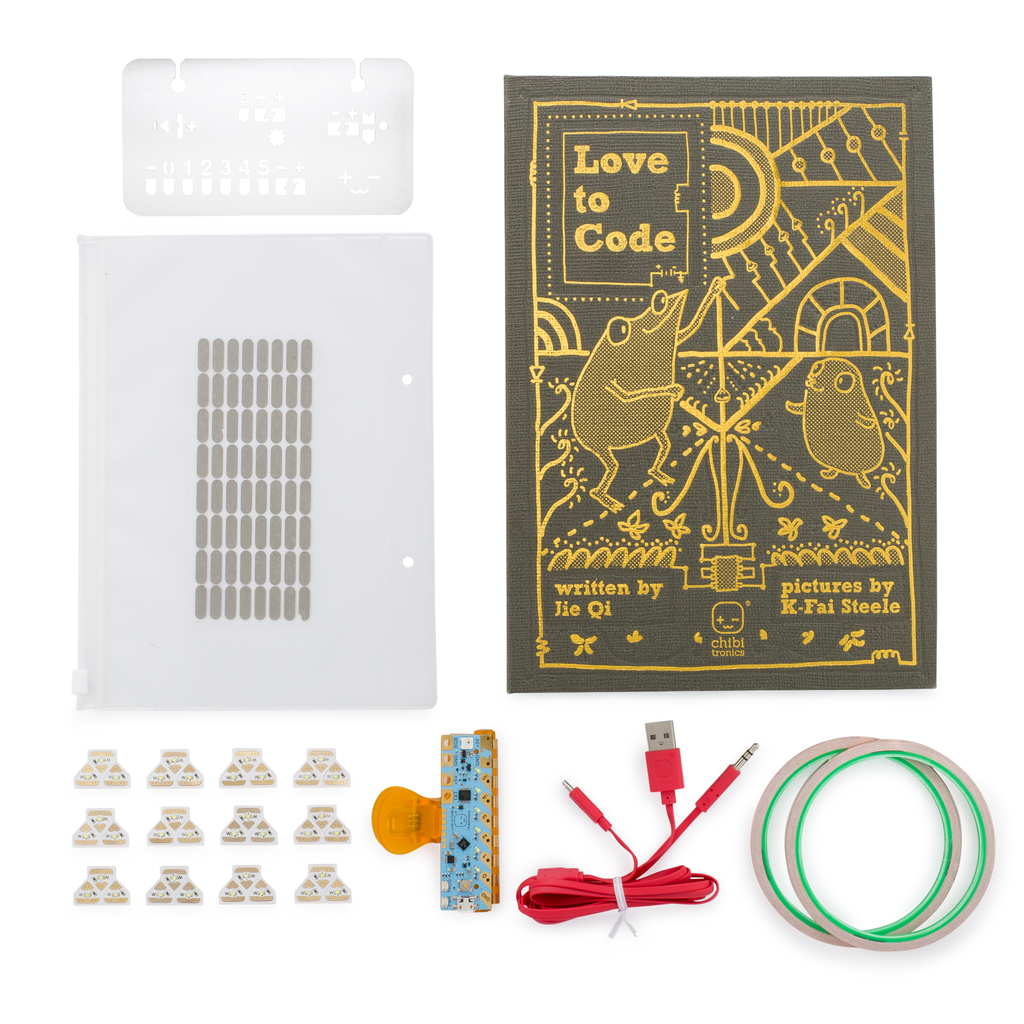
Materials
- Computer, tablet, or smartphone with an audio jack*
- Power source for Chibi Chip**
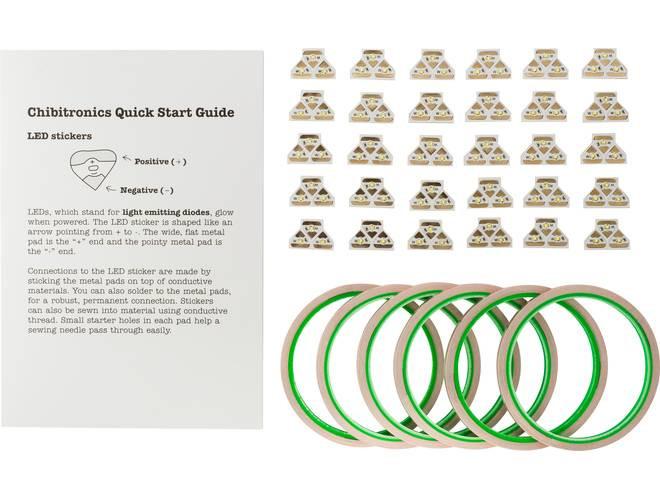
- 30 fabric tape patches
- 2 rolls copper tape
- Love to Code templates
Chibitronics Products
• Chibi Chip, Clip, and cable
• 30 Circuit Sticker LEDs, any mix of colors.
• See buying guide below for more info
Tools
- Scissors
- Pencils for sketching out circuits
- Colored pencils, markers, watercolors, or other drawing and art tools
- Scotch tape and glue sticks
*The coding environments (both text and block-based versions) run in a web browser and do not require any special installation.
**If using the full LTC kit, 3 AA batteries can be added to the binder for a portable power source. If not using the binder, the Chibi Chip can be powered by a computer’s USB port or by most USB wall adapters (such as those used to charge cell phones).
Buying Guide
(Note: make sure to get the 10% educator discount by signing up here!)
- For 1 student or team:
- Classroom bundle options:
- Budget Edition Classroom Bundle for 24 Students (print your own books)
- Book & Binder Edition Classroom Bundle for 12 students or teams (full kits with binders and printed pages; includes light sensor chapter add-on and extra materials for larger projects)
Preparation/Setup
- Put batteries (3 AA) in each LTC binder, if using binder. To test: Plugging in and Powering On
- Assemble Chibi Clips, if needed (these come pre-assembled in the LTC kits and value bundles)
- Print any materials needed. PDFs: Chibi Script | Microsoft MakeCode. Page numbers for each lesson are specified below.
Lesson 1
Key topics: simple parallel LED circuit, conductivity, using copper tape, using LED stickers
Consumable materials per student/team: At least 1 LED to complete template, plus 1 to 2 to experiment with parallel circuit
Template page numbers: Chibi Script: 1-2 to 1-4, MakeCode: 1-2 to 1-4
Lesson page numbers: Chibi Script: 1-5 to 1-9, MakeCode: 1-5 to 1-9
Videos: Chapter 1 Walkthrough, Plugging in and Powering On
Other recommended resources: Dandelion Painting Video
Lesson 2
Key topics: parallel and series circuits, turning corners with copper tape, patching circuits with fabric tape
Consumable materials per student/team: 3 to 4 LEDs for making their own circuit, 3 to 4 fabric tape patches
Template page numbers: Chibi Script: 1-15 to 1-17, MakeCode: 1-15 to 1-17
Lesson page numbers: Chibi Script: 1-10 to 1-14, MakeCode: 1-10 to 1-14
Videos: Turning Corners with Copper Tape, Parallel and Series Circuits
Other recommended resources: Introduction to Copper Tape
Lesson 3
Key topics: programming basic blink, loop, turn on, turn off
Consumable materials per student/team: 1 LED
Template page numbers: Chibi Script: 2-12 to 2-14, MakeCode: 2-18 to 2-20
Lesson page numbers: Chibi Script: 2-1 to 2-11, MakeCode: 2-1 to 2-17
Videos: Programming Demo, Chapter 2 Walkthrough
Lesson 4
Key topics: programming multiple pins
Consumable materials per student/team: 7 LEDs
Template page numbers: Chibi Script: 2-17 to 2-19, MakeCode: 2-23 to 2-25
Lesson page numbers: Chibi Script: 2-15 to 2-16, 2-20 to 2-21, MakeCode: 2-21 to 2-22, 2-26 to 2-27
Videos: Bring Light to Life (shows multiple pins in action)
Lesson 5
Key topics: design and program your own circuit
Consumable materials per student/team: 3 to 6 LEDs, copper tape, fabric tape patches
Template page numbers: Chibi Script: 2-22 to 2-24, MakeCode: 2-28 to 2-30
Lesson page numbers: Chibi Script: 2-23, MakeCode: 2-29
Videos: Crosses and Ts with Copper Tape, One Code, Many Projects (for inspiration)
Lesson 6
Key topics: simple switches
Consumable materials per student/team: 1 LED
Template page numbers: Chibi Script: 3-4 to 3-6, MakeCode: 3-4 to 3-6
Lesson page numbers: Chibi Script: 3-2 to 3-14, 3-36 to 3-38, MakeCode: 3-2 to 3-15, 3-36 to 3-38
Videos: Chapter 3 Walkthrough (part 1)
Lesson 7
Key topics: variables, code comments, code readability
Consumable materials per student/team: n/a
Template page numbers: n/a
Lesson page numbers: Chibi Script: 3-15 to 3-17, MakeCode: 3-16 to 3-17
Lesson suggestions: Ask students to clean up their code with variables and comments, then swap code with another student or team. The new team should make a change to the code (“remix” the project). Discuss as a group: what made it easier or harder to modify others’ code?
Lesson 8
Key topics: papercraft switches, design your own switch
Consumable materials per student/team: 1 LED for each type of switch (4 total) plus 1-3 for student-designed switch
Template page numbers:
- pop-up switch: Chibi Script: 3-22 to 3-24, MakeCode: 3-22 to 3-24
- press-the-flap: Chibi Script: 3-25 to 3-28, MakeCode: 3-25 to 3-28
- wind sensor: Chibi Script: 3-29 to 3-30, MakeCode: 3-29 to 3-30
- pocket character switch: Chibi Script: 3-31 to 3-33, MakeCode: 3-31 to 3-33
- make your own: Chibi Script: 3-34, MakeCode: 3-34
Lesson page numbers: Chibi Script: 3-18 to 3-21, MakeCode: 3-18 to 3-21
Videos: Chapter 3 Walkthrough (part 2)
Lesson 9
Key topics: fading (analog output), while loops
Consumable materials per student/team: n/a
Template page numbers: n/a (use template from earlier lesson)
Lesson page numbers: Chibi Script: 4-1 to 4-11, 4-24 to 4-25, MakeCode: 4-1 to 4-11, 4-24 to 4-25
Videos: Chapter 4 Walkthrough (first minute)
Lesson 10
Key topics: multithreading
Consumable materials per student/team: 5-8 LEDs, 5-8 conductive fabric patches
Template page numbers: Chibi Script: 4-18 to 4-23, MakeCode: 4-18 to 4-23
Lesson page numbers: Chibi Script: 4-12 to 4-17, MakeCode: 4-12 to 4-17
Videos: Chapter 4 Walkthrough (starts after first minute)
Lesson 11 (Light Sensor Add-On)
Key topics: electronic sensors, conditionals
Consumable materials per student/team: 1 light sensor sticker, 3 fabric patches, 1 LED
Template page numbers: Chibi Script only: LS-4 to LS-6
Lesson page numbers: Chibi Script only: LS-2 to LS-3, LS-7 to LS-10, first paragraph of LS-11, LS-24
Lesson 12 (Light Sensor Add-On)
Key topics: analog input, variables
Consumable materials per student/team: 1 light sensor sticker (can reuse from Lesson 11), 3 fabric patches, 7-10 LEDs
Template page numbers: Chibi Script: LS-12 to LS-14, LS-20 to LS-22
Lesson page numbers: Chibi Script: LS-11, LS-15 to LS-19
Suggested CSTA Standards
Lessons 3-7, 9-12
1B-AP-09 3-5 Create programs that use variables to store and modify data.
1B-AP-10 3-5 Create programs that include sequences, events, loops, and conditionals.
All Lessons:
1B-AP-12 3-5 Modify, remix, or incorporate portions of an existing program into one’s own work, to develop something new or add more advanced features.
1B-AP-15 3-5 Test and debug (identify and fix errors) a program or algorithm to ensure it runs as intended.
(after L7) 2-AP-19 6-8 Document programs in order to make them easier to follow, test, and debug.
Projects:
1B-AP-16 3-5 Take on varying roles, with teacher guidance, when collaborating with peers during the design, implementation, and review stages of program development.
1B-AP-17 3-5 Describe choices made during program development using code comments, presentations, and demonstrations.
1B-IC-20 3-5 Seek diverse perspectives for the purpose of improving computational artifacts.
2-CS-02 6-8 Design projects that combine hardware and software components to collect and exchange data.
2-DA-08 6-8 Collect data using computational tools and transform the data to make it more useful and reliable.
2-AP-18 6-8 Distribute tasks and maintain a project timeline when collaboratively developing computational artifacts.
1B-DA-07 3-5 Use data to highlight or propose cause-and-effect relationships, predict outcomes, or communicate an idea.
3A-DA-11 9-10 Create interactive data visualizations using software tools to help others better understand real-world phenomena.