Recently, a customer sent in a question that was so illuminating, so essential, that it prompted us to pause and reflect:
Once you complete the circuit and put the stickers on, what turns the light off?
Customer Inquiry
In today’s post, a tribute to the powerhouse working behind the scenes, we are placing a spotlight upon the humble switch.
If you have been making paper circuits for some time, the concept of adding a switch to a project might be something that you’ve come to take for granted. But, if you are relatively new to the concept, you might not know that switches are the unsung heroes that allow us to do more than simply control whether a light is turned on or off!
Often taking a backstage role, switches add interactivity and creativity to our projects in countless ways! Without switches, the lights in our projects would remain turned on until the battery died, and they wouldn’t be nearly as fun to tinker with!
What is a switch?
A switch is a gap in a circuit that can be disconnected or connected, opened or closed. If you think of a circuit as a closed loop, a switch is a break—an interruption—to that loop.
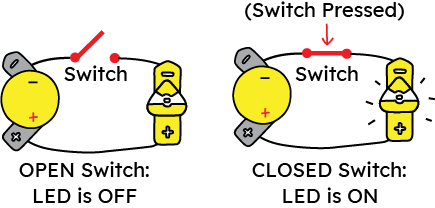
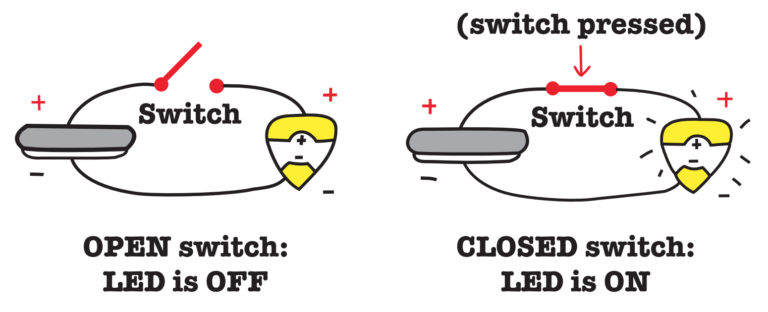
When a switch is open, electrons cannot find a closed loop to travel through; so, they will stop flowing, and a light will turn off.
When a switch is closed, completing the loop and allowing the electrons to flow through the circuit, a light will turn on.
A gap may be created anywhere within a circuit, and any conductive material may be used to close that gap. Switches, therefore, may take many different forms, ranging from flaps and buttons to magnets and paper clips. Switches may be constructed by hand, using conductors such as aluminum foil or Conductive Fabric Tape, or created with help from special components.
In 10 Ways to Add a Switch to a Paper Circuit, we’ve sorted a variety of switches into categories, found some inspiring examples, and linked to tutorials for each one. We hope that this resource will help new and experienced educators, artists, and makers to think about switches in a new way.
1. Battery Holder Switches
One of the simplest ways to create a switch, to interrupt the flow of electrons within a circuit, is by disconnecting the battery. In other words, a battery holder can also serve as a switch!
One way this may be accomplished is by using a removable binder clip.
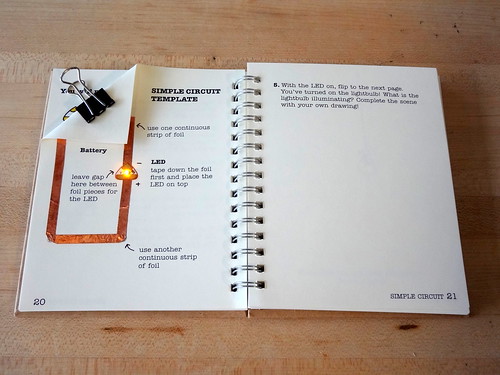
Simple Circuit template by Jie Qi
Another way is by creating a battery housing that opens and closes by way of a folding flap.
Chibitronics for Papercrafters: Simple On Off Battery Holder video by Jessica Frost-Ballas
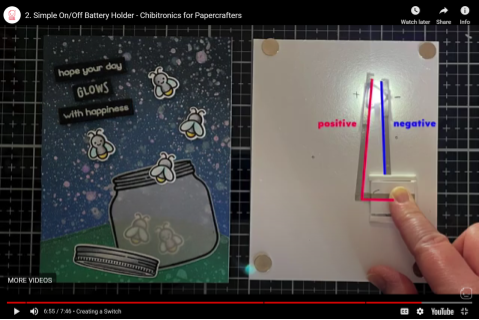
Still another way is by using a battery holder designed to be used as a push button.
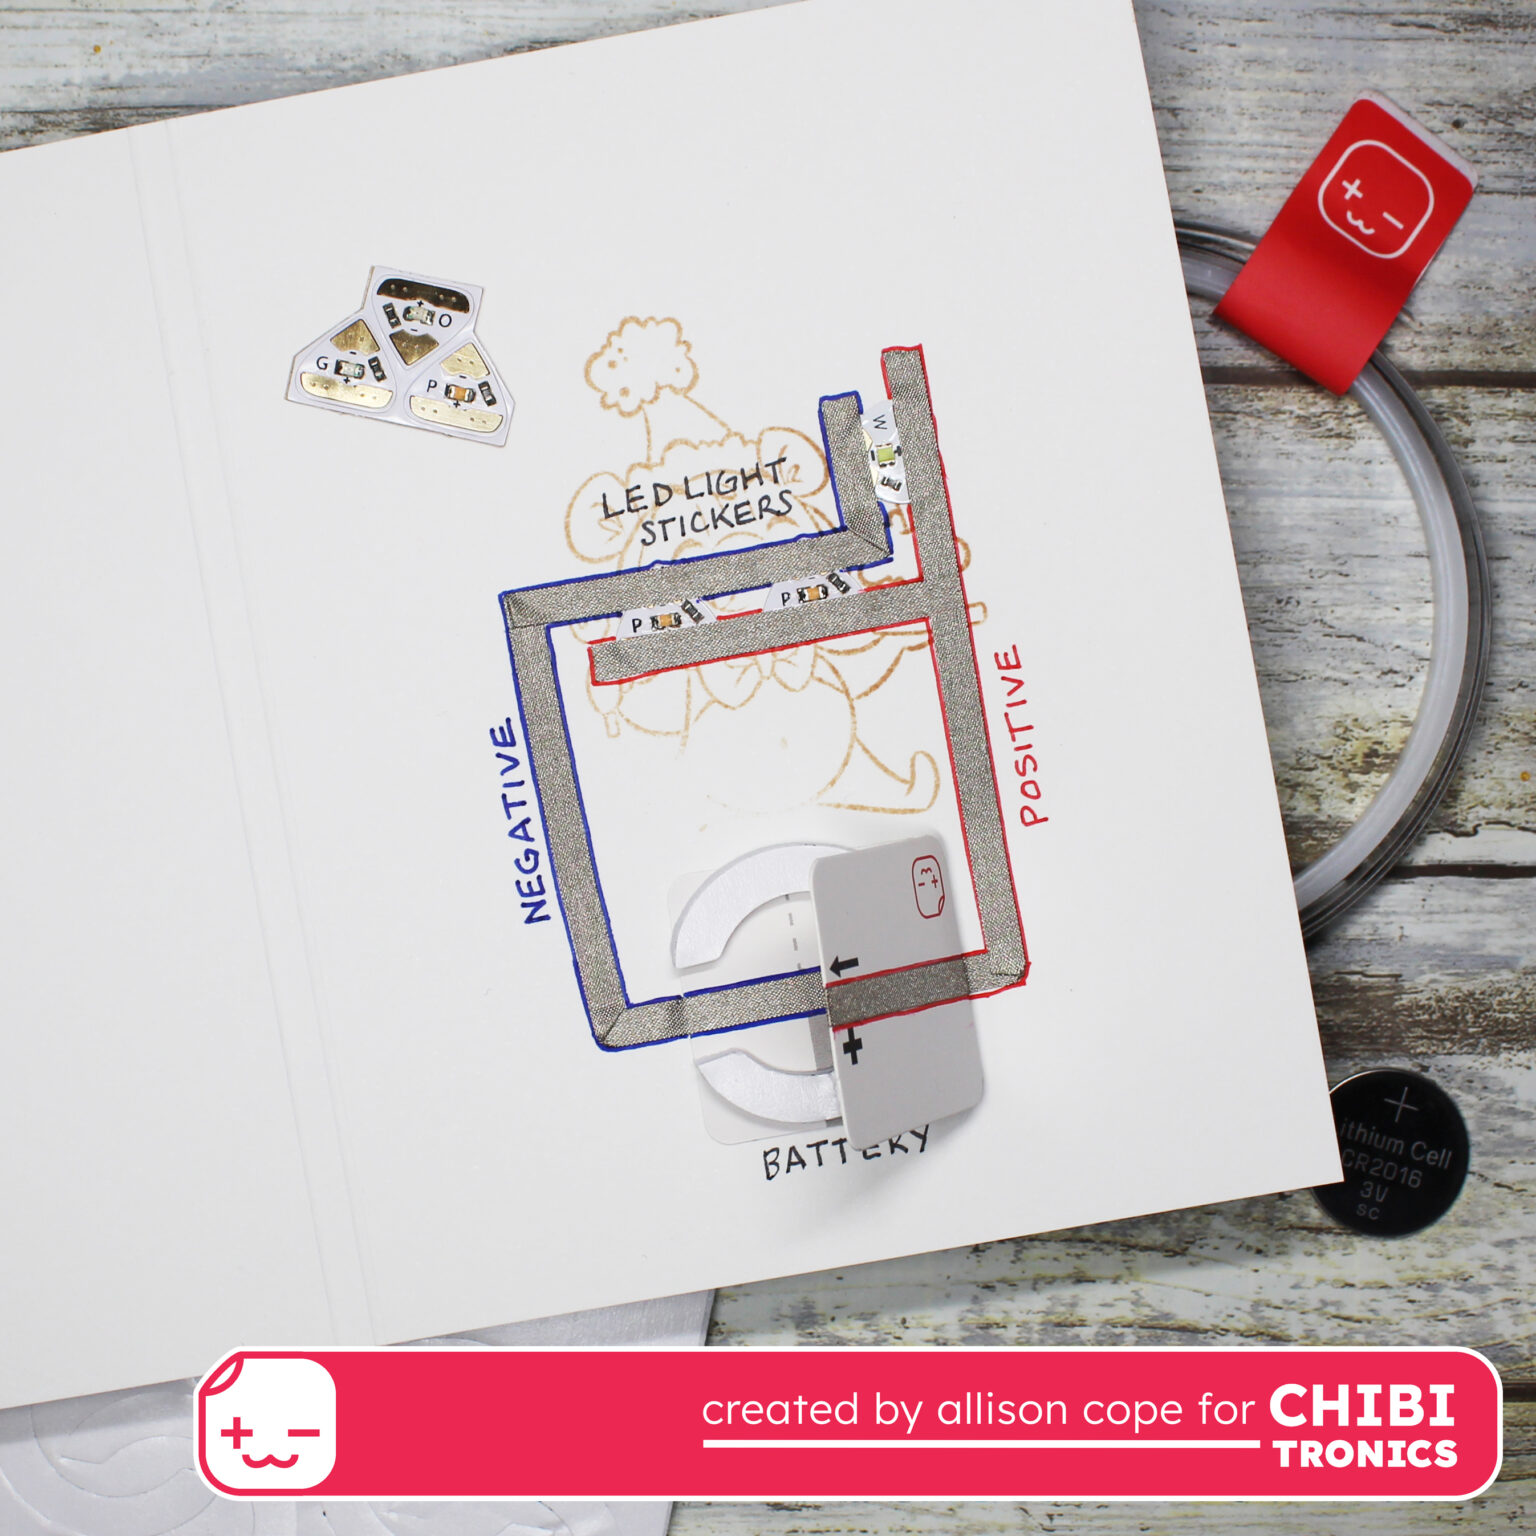
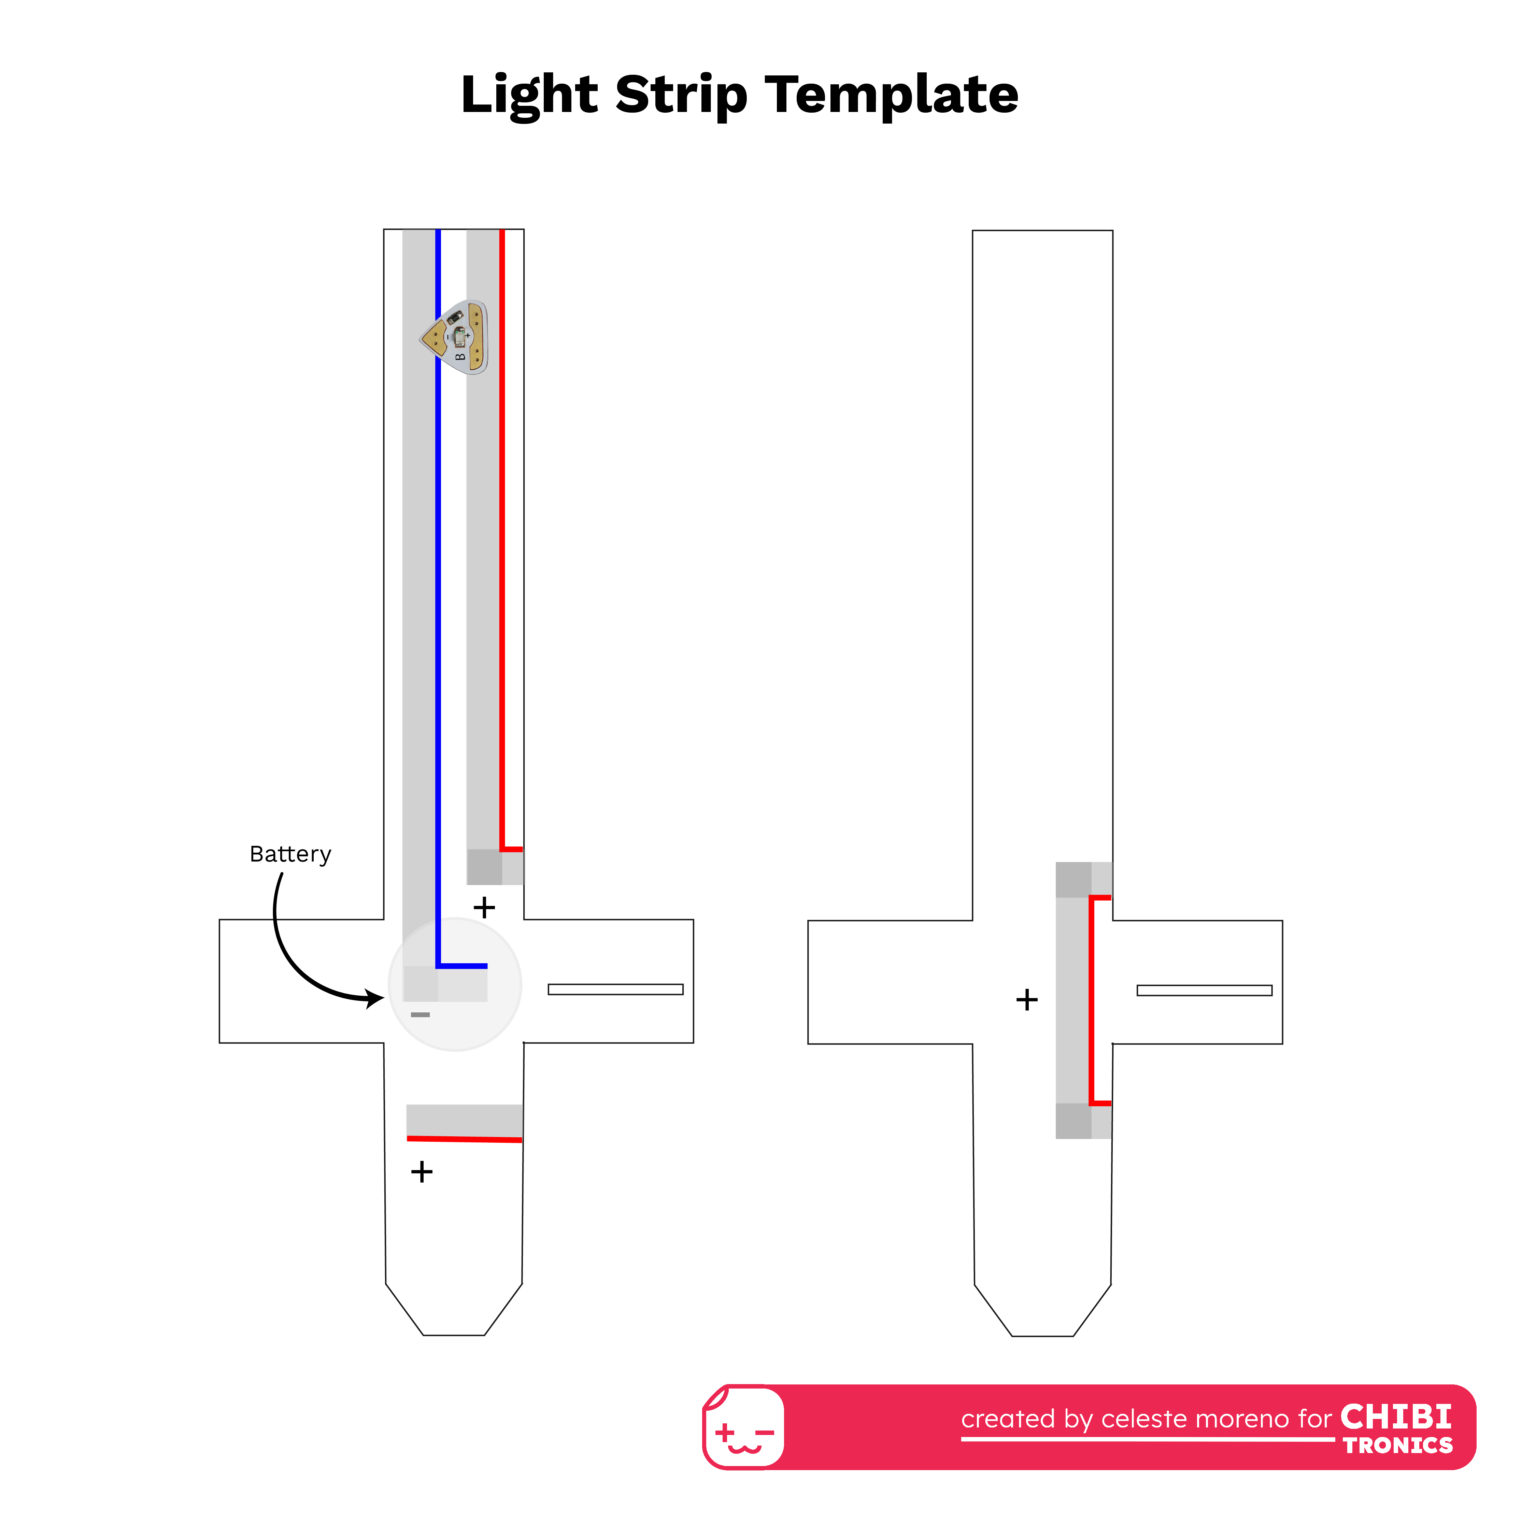
Birthday Panda Card by Allison Cope
This method integrates a folding paper flap to close the circuit and hold the battery in place.
Make a Robot Badge by Kathy Ceceri
Here are two more methods of combining a battery holder with a folding flap that can switch the circuit on or off.
This project uses special battery holders as switches to light up gorgeous handmade lanterns. The lights only turn on when a flap in the battery holder is moved out of the way!
Paper Lanterns by Celeste Moreno
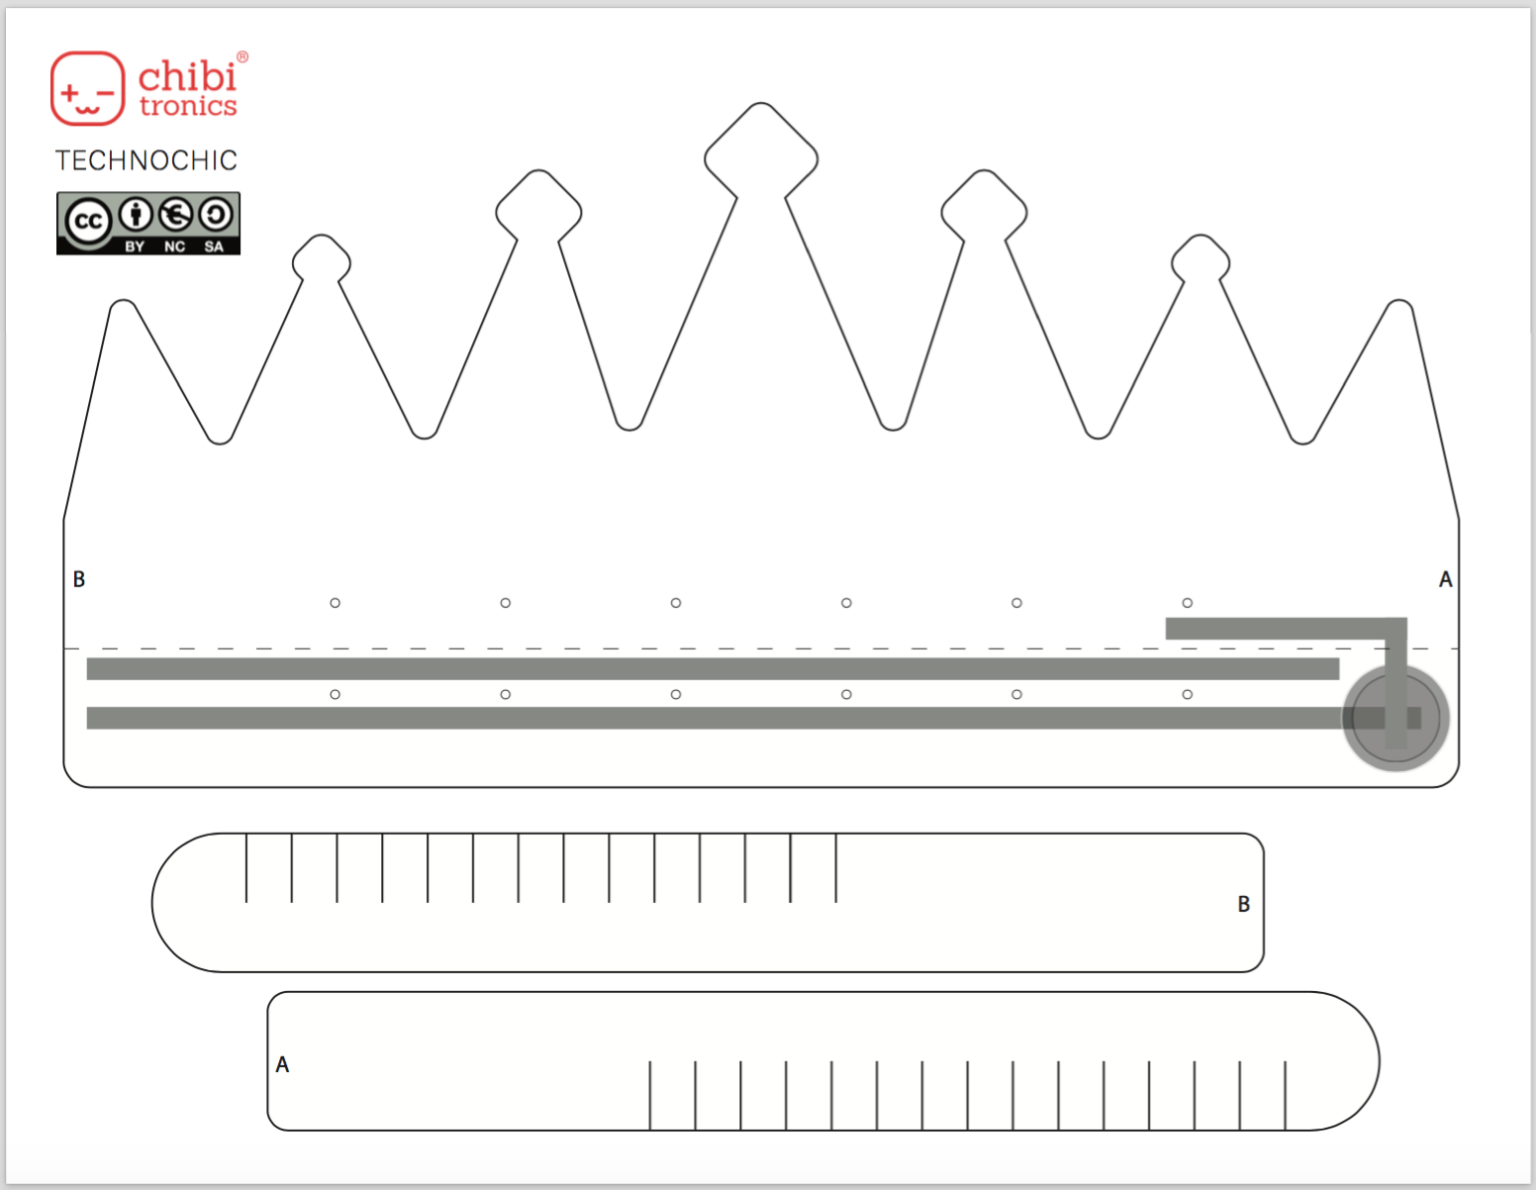
This project holds and conceals a battery, while acting as a hidden switch, inside of a wearable, adjustable paper crown. The lights only turn on when the headband is flipped up!
Folding Paper Crown by Natsha Dzurny
2. Flap Switches
Another way to create a switch is by deliberately leaving a gap in a place that encourages interactivity from a viewer. To close the gap in the circuit, simply add a piece of copper or Conductive Fabric Tape to a paper flap and press it down over the switch gap.
One way this may be accomplished is by following this template from the Circuit Sticker Sketchbook.
DIY Switch Tutorial by Jie Qi

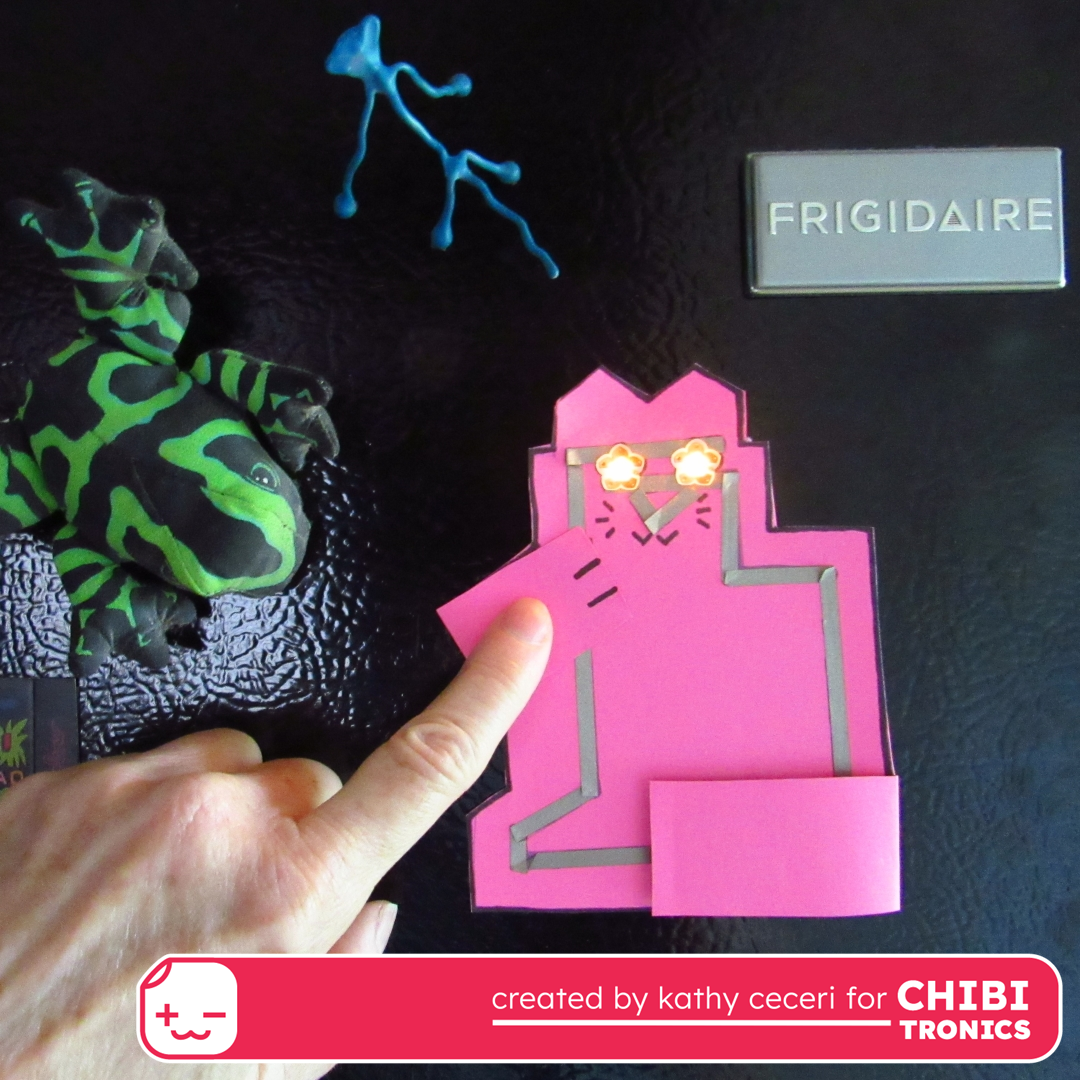
In this adaptation, the switch takes the shape of a cat’s arm.
RoboKitty Fridge Magnet by Kathy Ceceri
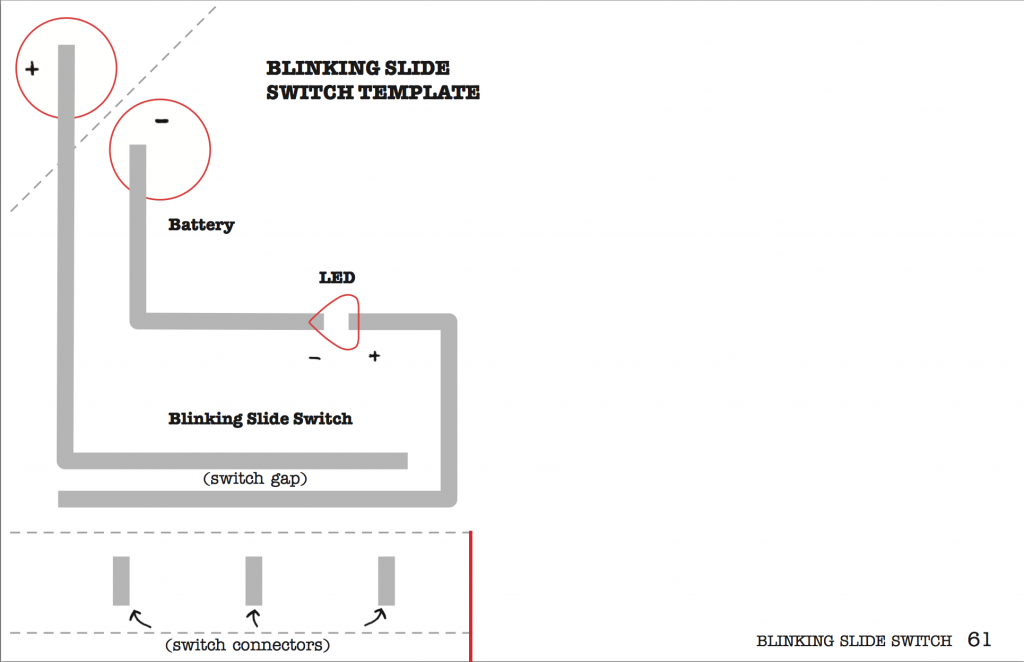
You can also add more than one conductive contact to a flap, or add more LEDs, to create a blinking effect.
One way to do this is by following this example from the Circuit Sticker Sketchbook.
Blinking Slide Switch Tutorial by Jie Qi
In this example, a paper flap may be pressed down to control multiple LED’s.
Slide Switch for Light Sequence video by Jessica Frost-Ballas

3. Button Switches
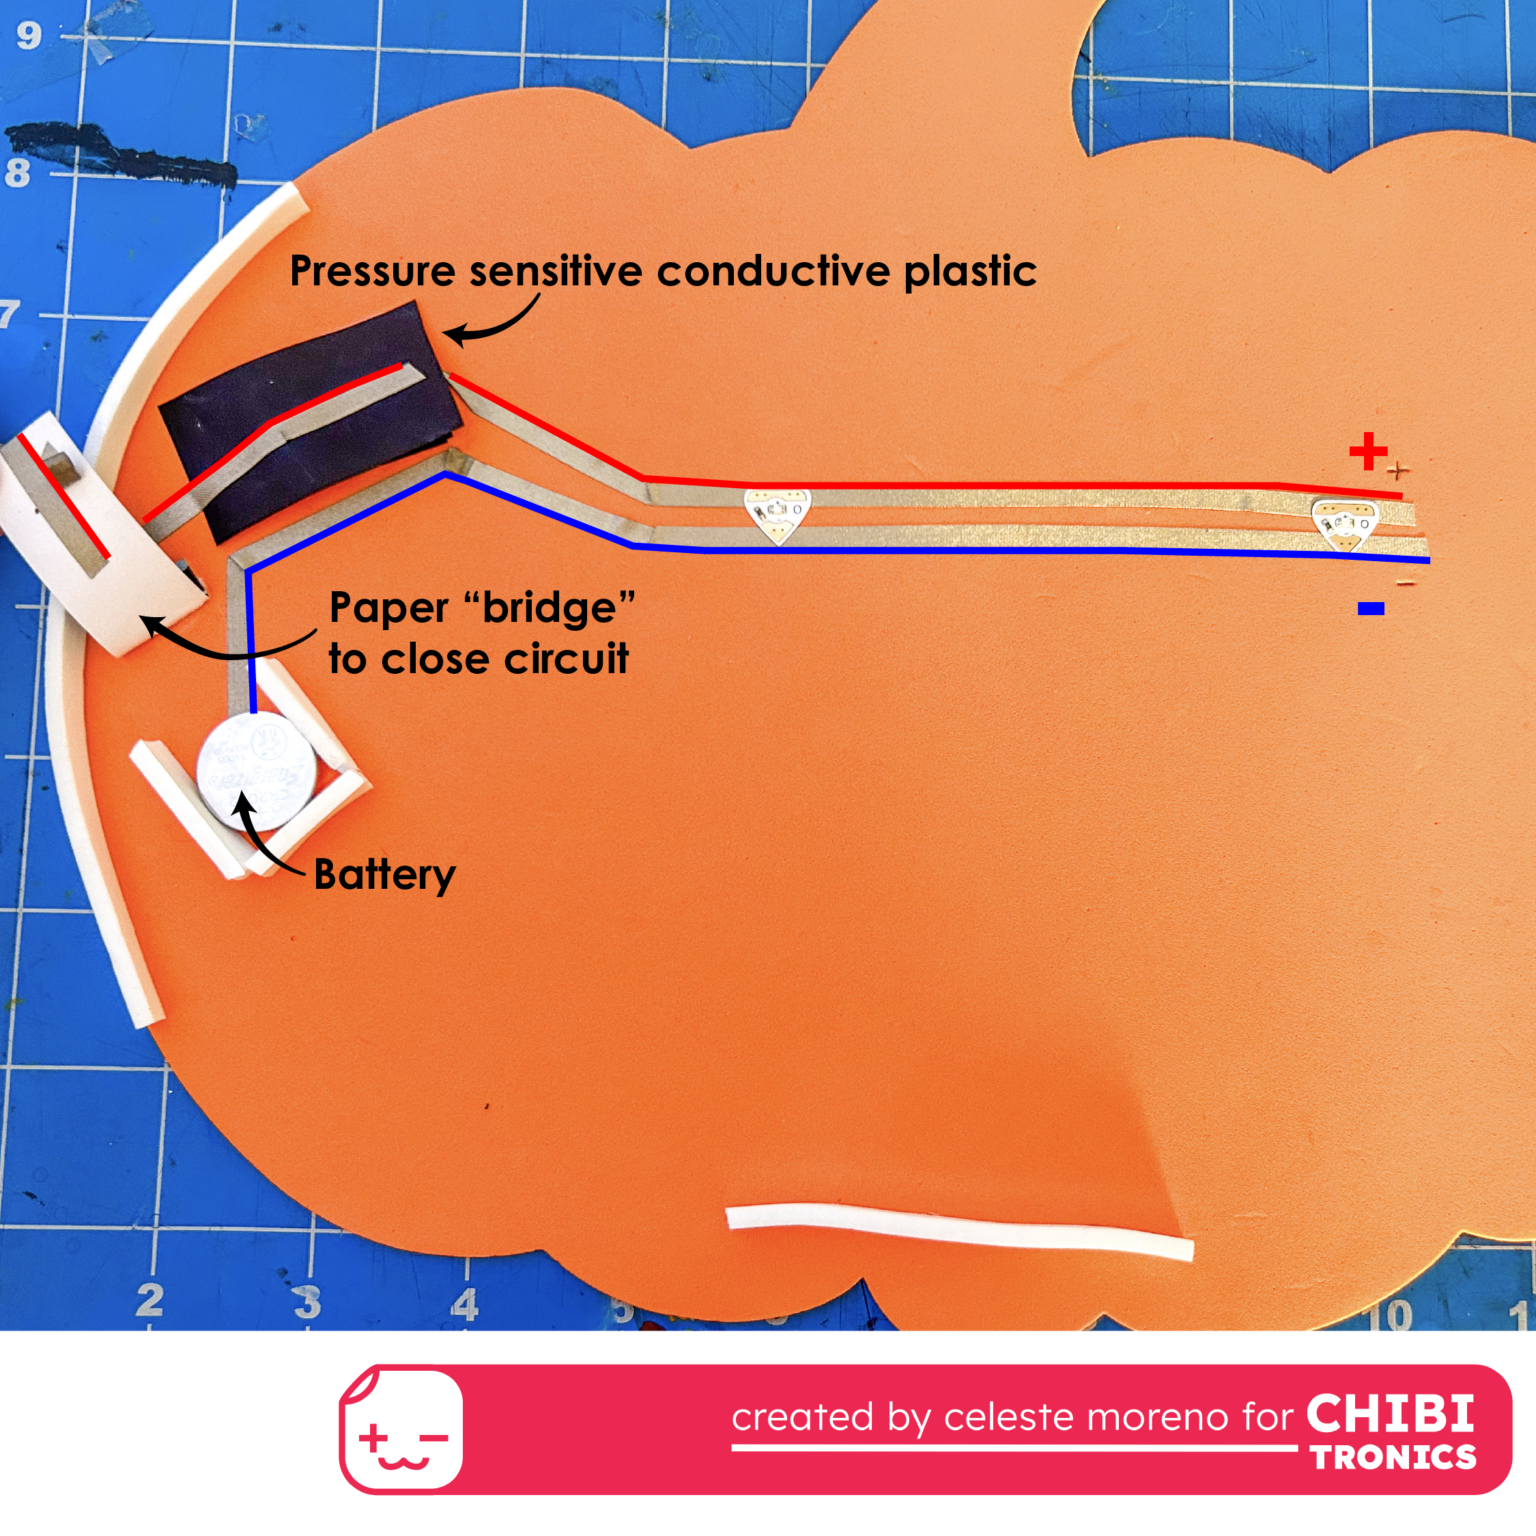
By adding a piece of Pressure Sensitive Conductive Plastic to a flap switch, you can create a push-button switch with a fading effect that requires a bit more pressure to close the gap.
The examples in this tutorial show two ways to make a push button switch, to achieve two different effects in a holiday decoration.
Bright Halloween Ideas by Celeste Moreno
This example shows how a push button switch may be constructed from materials that you might have laying around your house, such as contact paper and aluminum foil.
Mixed Media Button Switch by Celeste Moreno
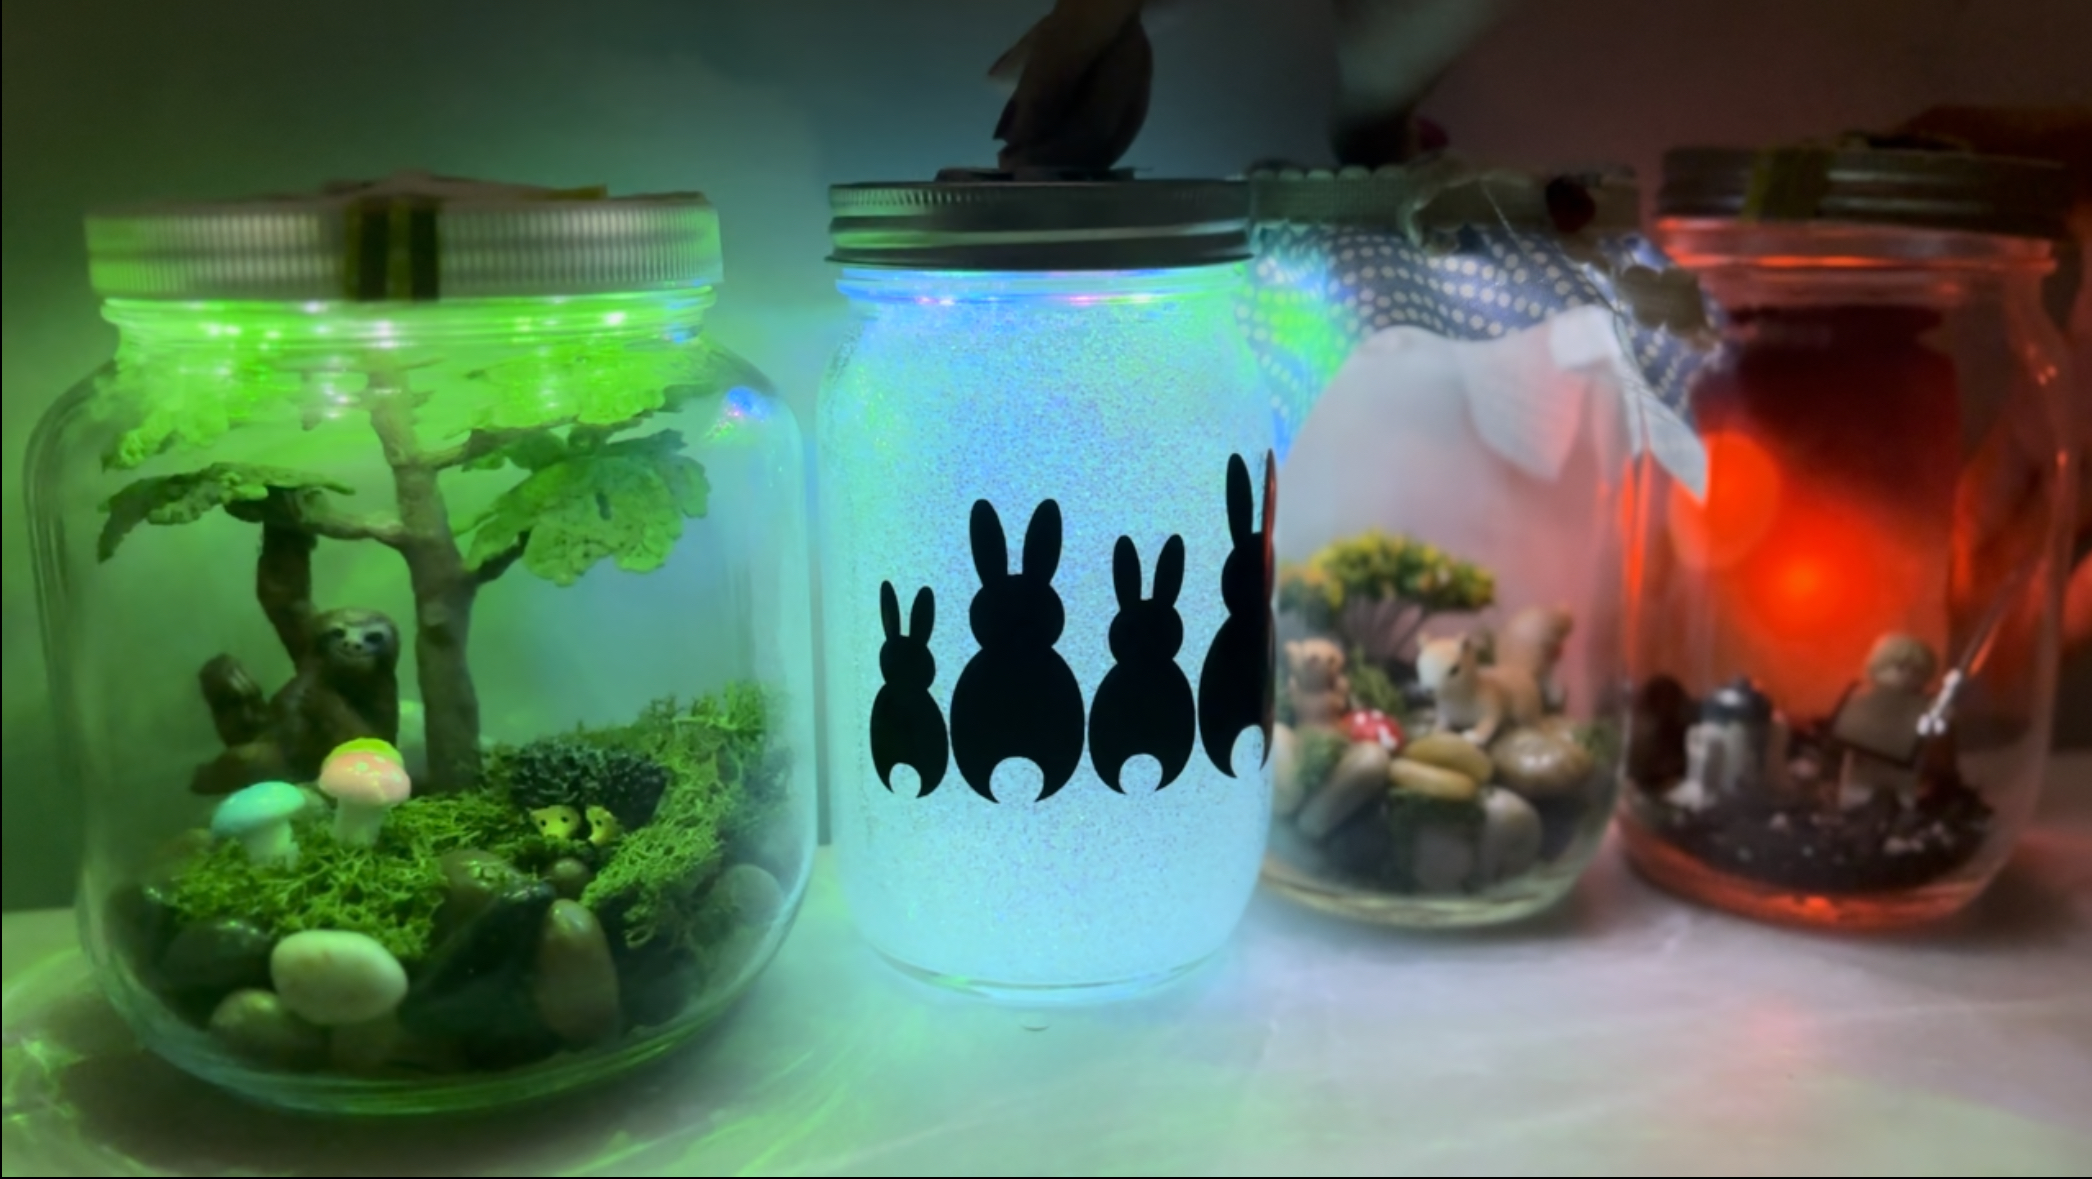
In this eye-catching example a piece of Pressure Sensitive Conductive Plastic added to a battery housing, on top of a mason jar lid, creates an inviting pressure switch!
Mason Jar Fairy House by Krafti Karma
4. Switches With Metal Components
Metal objects such as coins and brads can also be integrated into your switch designs.
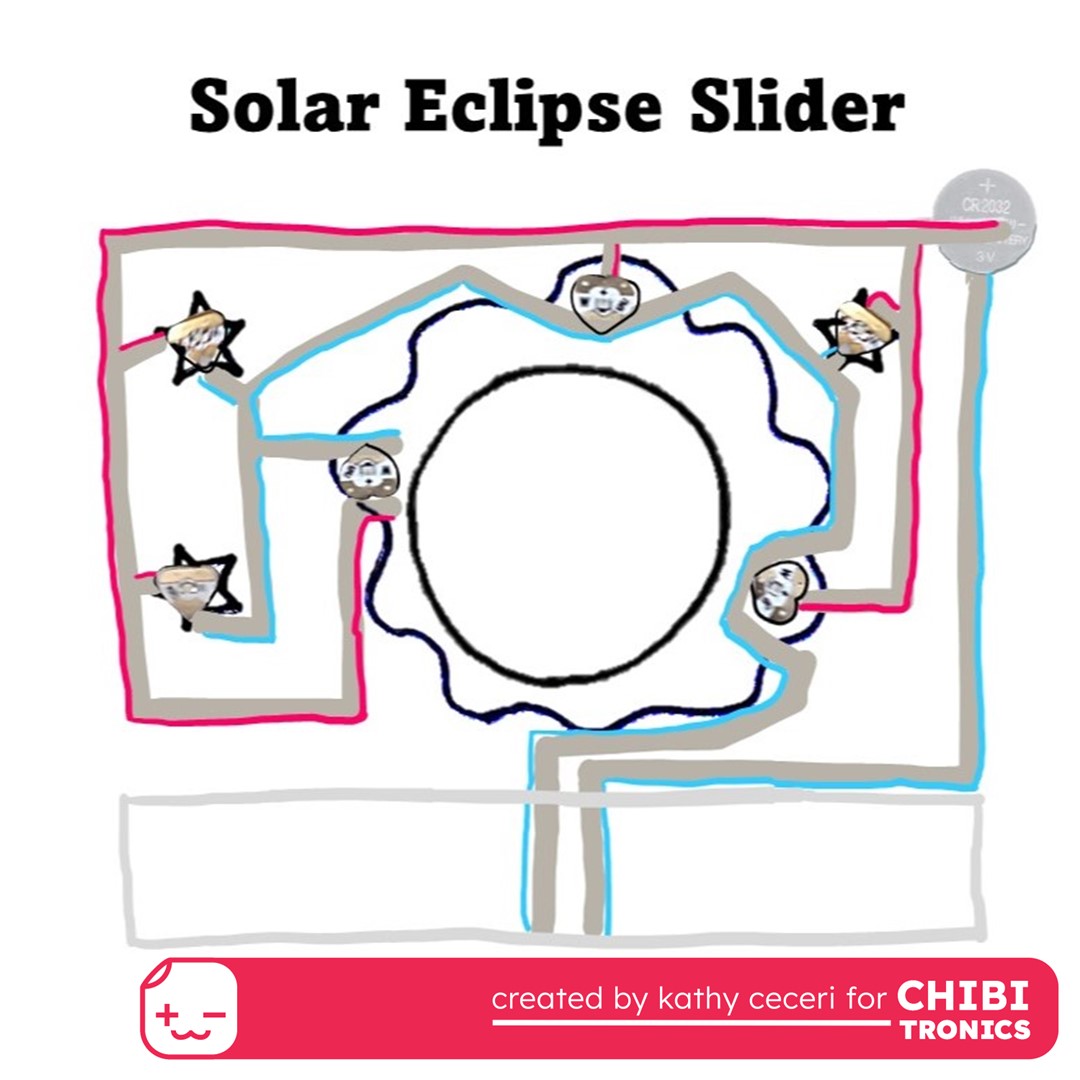
This stunning celestial example uses a nickel to create a slider switch. Did you know that a nickel is an outstanding conductor of electricity?
Solar Eclipse Slider template and classroom activity by Kathy Ceceri
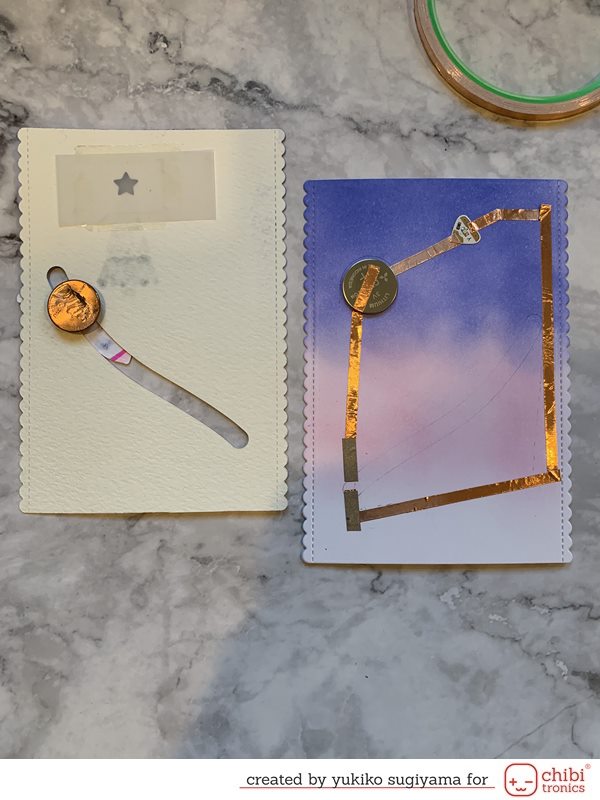
This fun example uses a copper penny to open and close the circuit, as it moves through a channel. Like copper tape, a penny is conductive!
Penny Slider Switch card by Yukiko Sugiyama
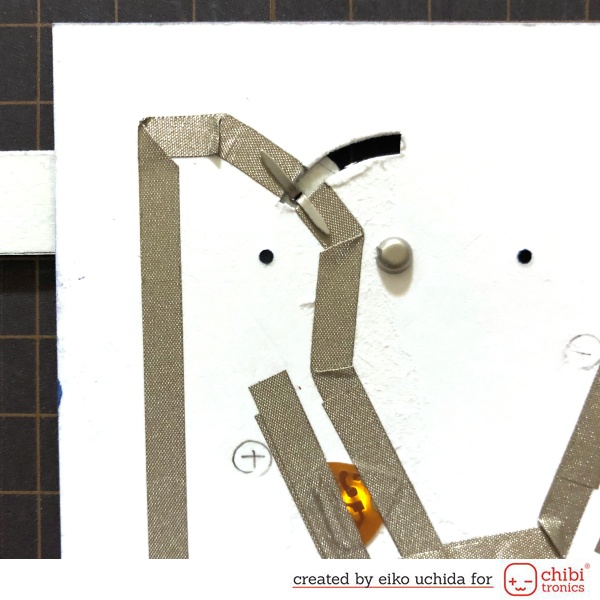
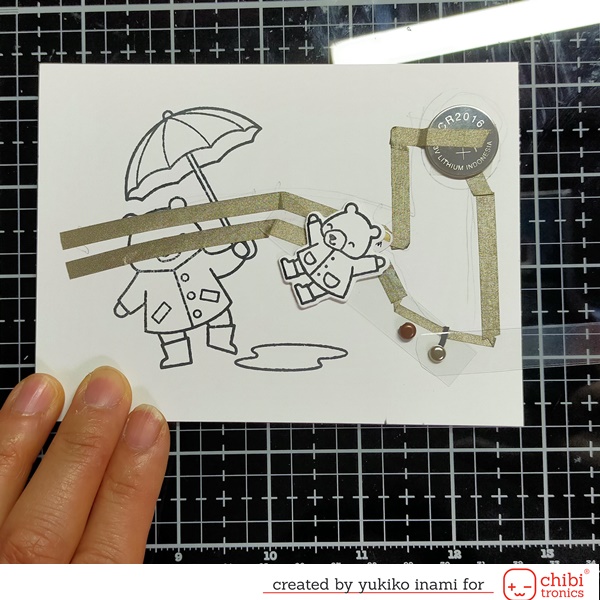
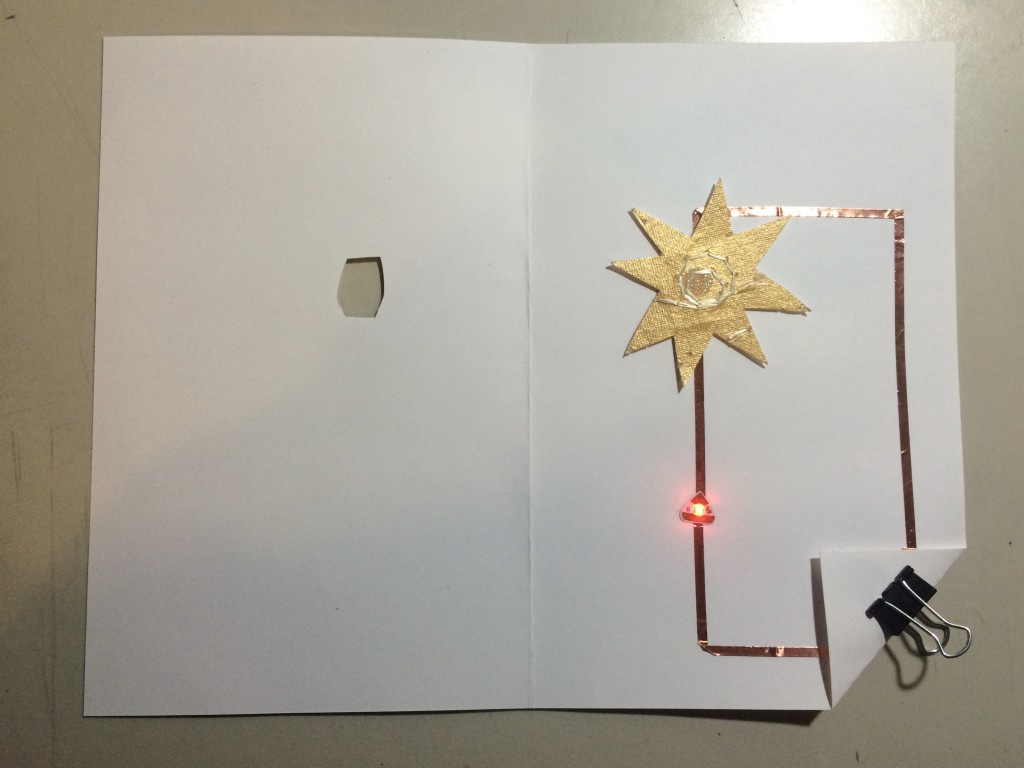
The next two examples use metal brads connected to levers to serve as switches.
Reach for the Stars Card by Eiko Uchida
Make Splash Card by Yukiko Inami
This example uses a decorative metal brad as rotating switch.
Heart Pin with a Rotating Switch by Jill Dawson

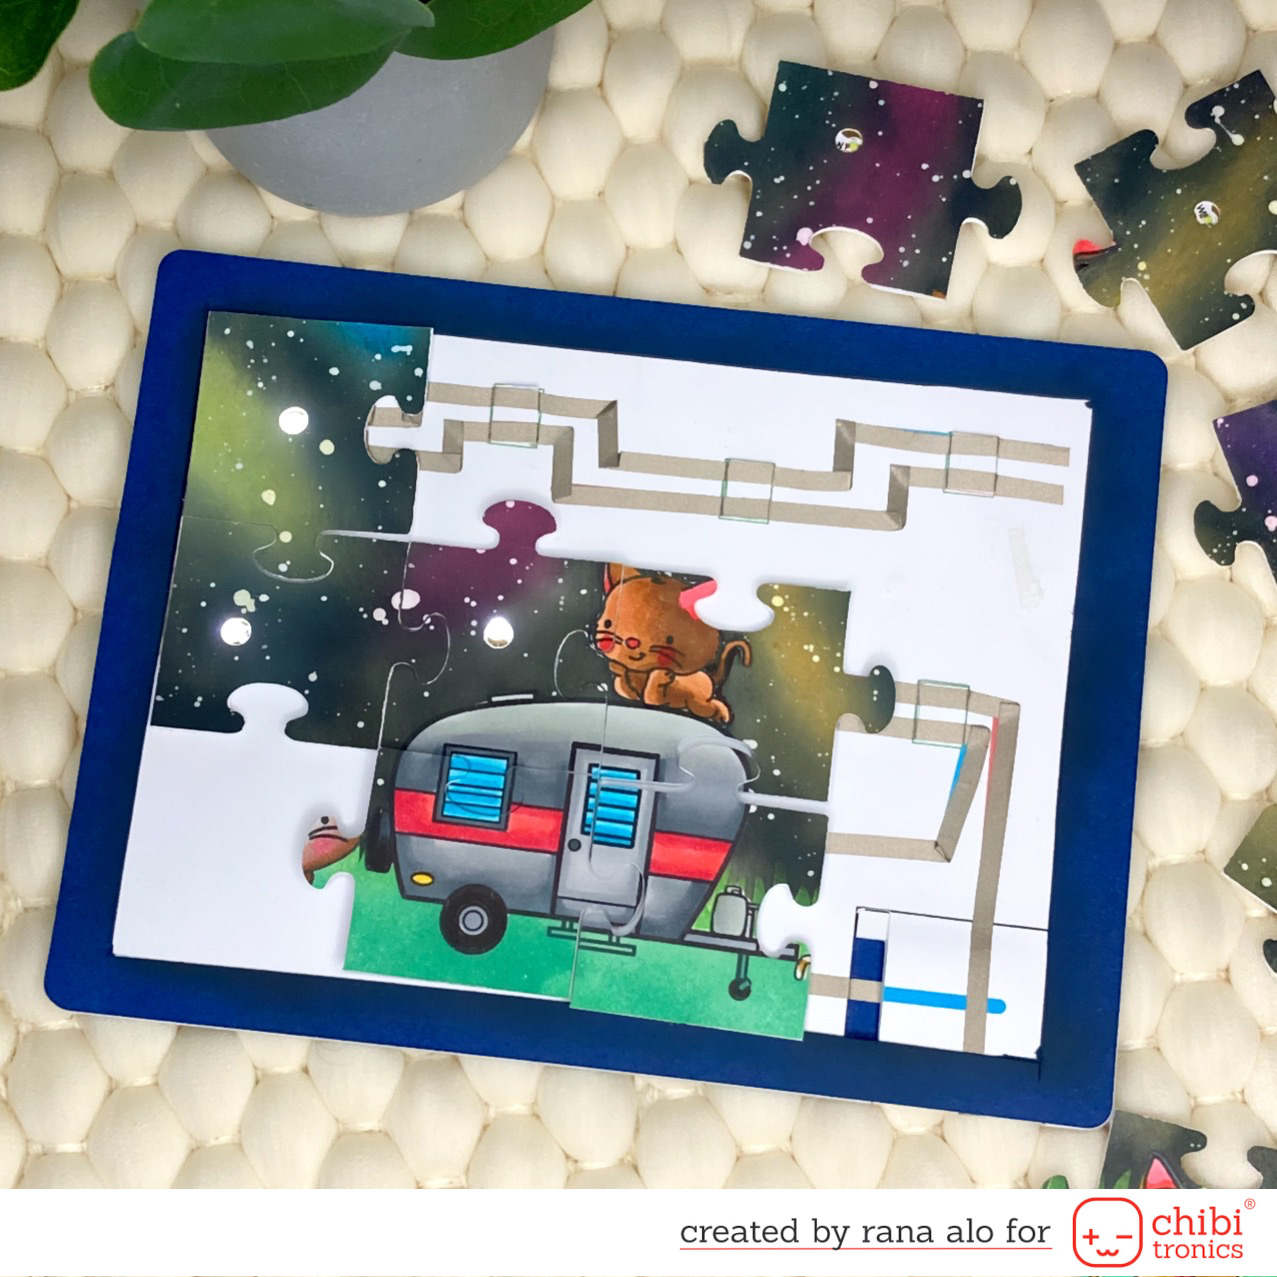
5. Puzzle Piece Switches
Another innovative switching mechanism uses light-up puzzle pieces to bridge the gaps in a parallel circuit!
Here is a detailed tutorial with templates and a video demonstration, showcasing an example of how this might be achieved.
Light Up Puzzle post by Rana Alo
6. Magnets as Switches
Magnets may also be used to close a switch gap.
This example uses interchangeable paper decorations backed with sheet magnets to complete a circuit.
Magnetic Switch Tutorial by Aslid
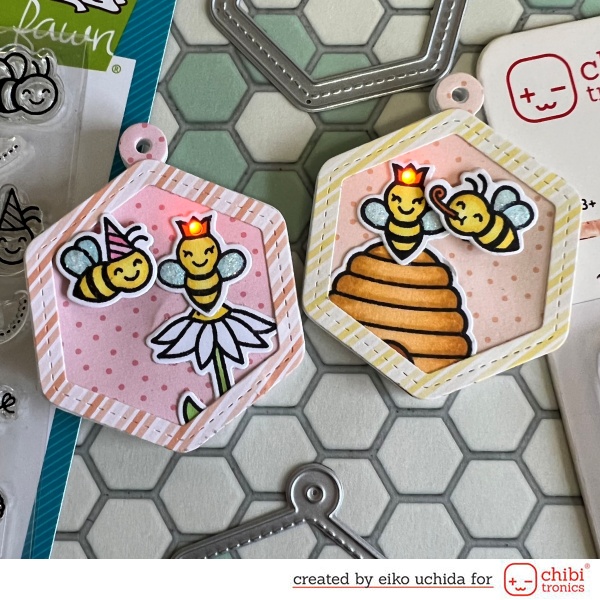
This example uses two strong disk magnets, which attract each other, to close a gap in a circuit.
Light Up Hive Five Tag by Eiko Uchida
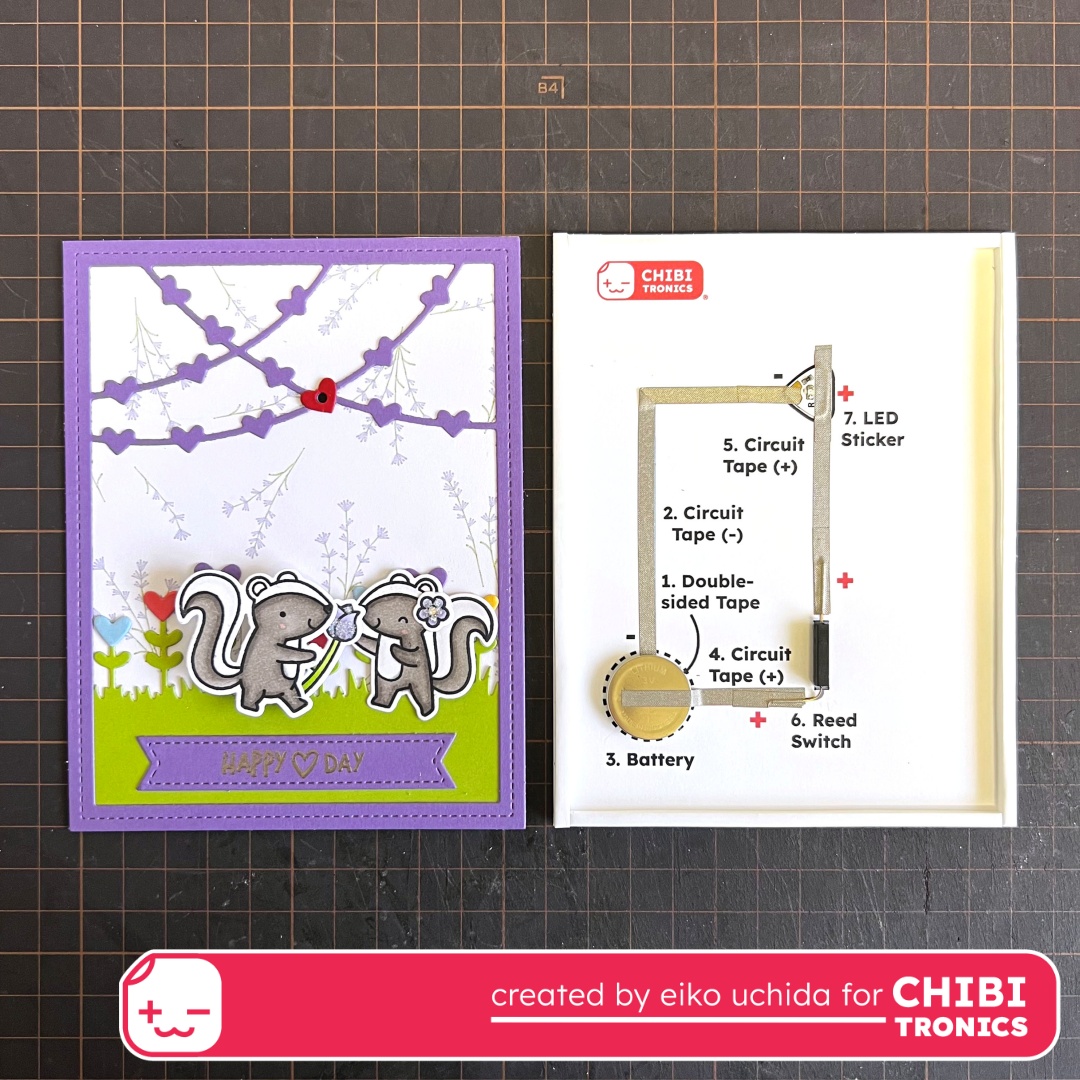
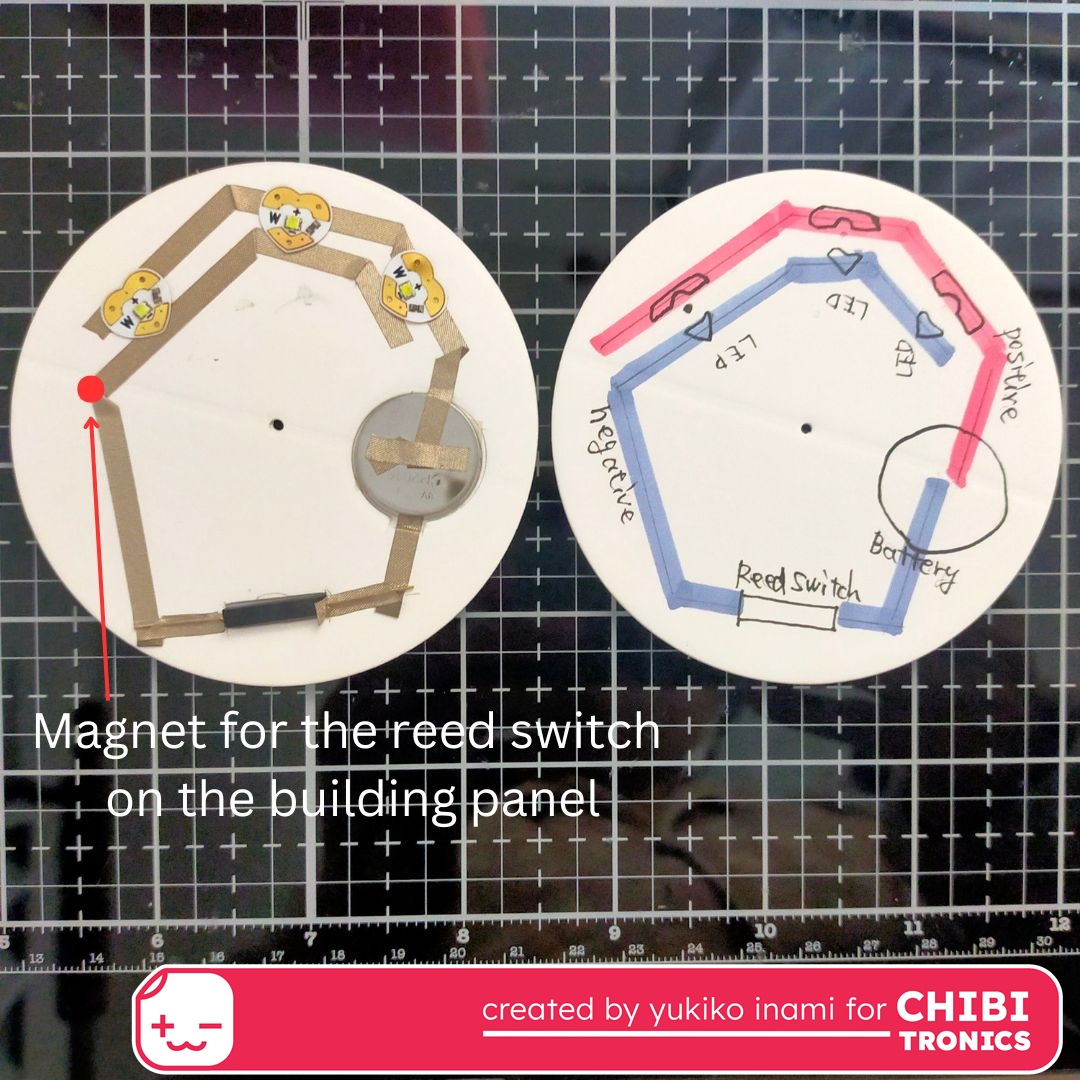
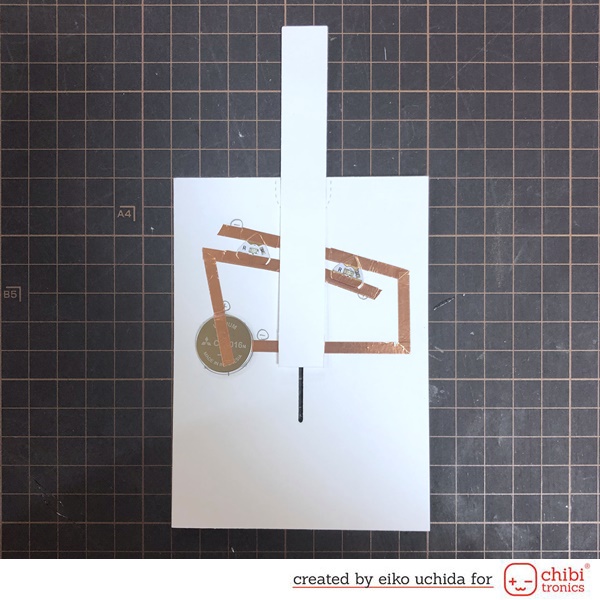
7. Reed Switches
Magnets, paired with reed switches, may also be used to close a switch gap. Reed switches (Magnet On) add a great deal of interactivity to a project.
Here is an example of how to use a reed switch to add interactivity to a card.
Light Up Skunk Card by Eiko Uchida
In this advanced example, two reed switches control lights for a very surprising effect.
Looking Over the Rooftops by Yukiko Inami
To learn more about reed switches, visit Magical Magnetism: How to Use Reed Switches.
8. Tilt Switch
A tilt switch is a type of switch that uses motion and an angle of incline to open and close a circuit.
One way to create your own tilt switch is by sewing a metal bead to a piece of paper using conductive thread.
Simple Paper Tilt Switch/ Sensor by Jill Dawson
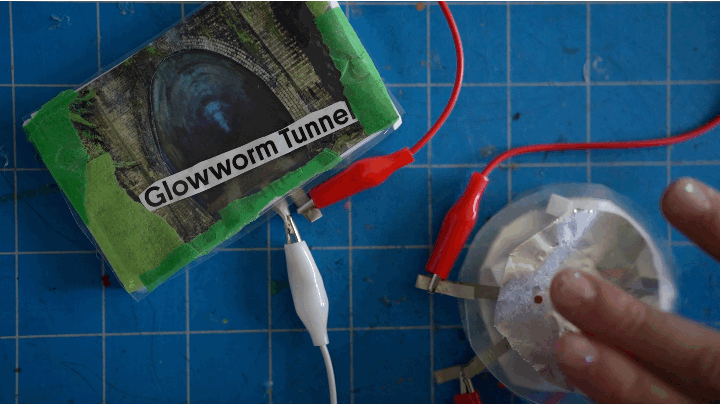
Here’s another example, featuring a tunnel book that uses a commercially available tilt ball switch.
Tilt Sensing Tunnel Book by Jill Dawson
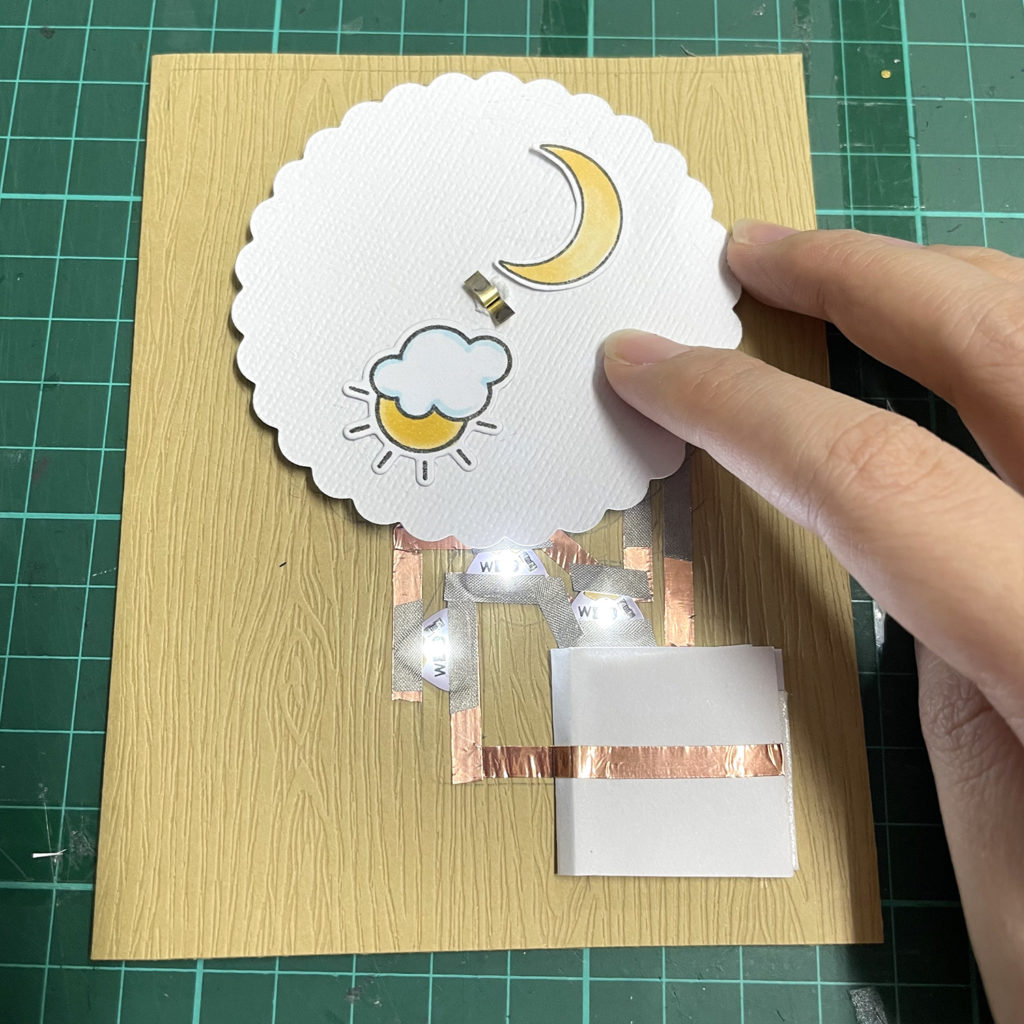
9. Folded Paper Sliding Switch
One of the most versatile switch innovations to emerge from our Design Team is the use of a folded piece of paper to create a sliding pull-tab switch that closes a gap in a circuit.
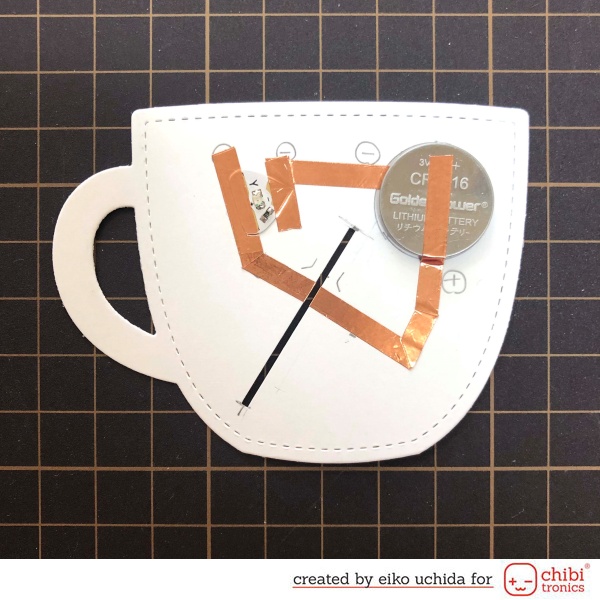
This example uses a folded paper switch attached to a spoon to light up the contents of a mug.
Light Up Mug Card by Eiko Uchida
This three dimensional example combines a sliding paper switch with a pop up.
Pop Up Box Card by Yukiko Inami
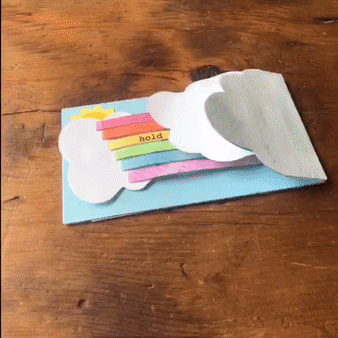
This example also combines a sliding paper switch with elements that pop up.
Rainbow Pop Up Card with a Sliding Switch by Jill Dawson
This example uses a bit of geometry to change the orientation of a paper sliding switch, to allow a door on a tree house to open and close the circuit.
Gnome House with a tab switch by Yukiko Inami

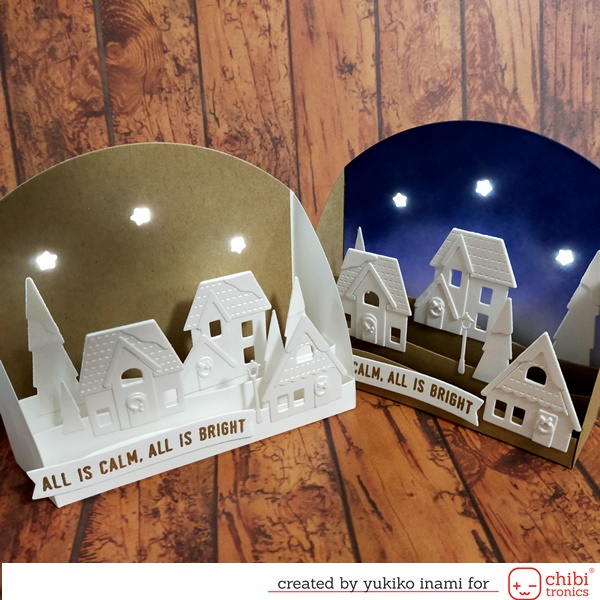
10. Hub/Wheel/Disk Switches
A switch can also be made by adding conductive material to a rotating disk that spins into place to close a gap in a circuit.
In this example, a die cut disk rotates inside of a greeting card to open and close a circuit that lights up a house.
Interactive Reveal Wheel and Light Up Card by Wei Wei Wang
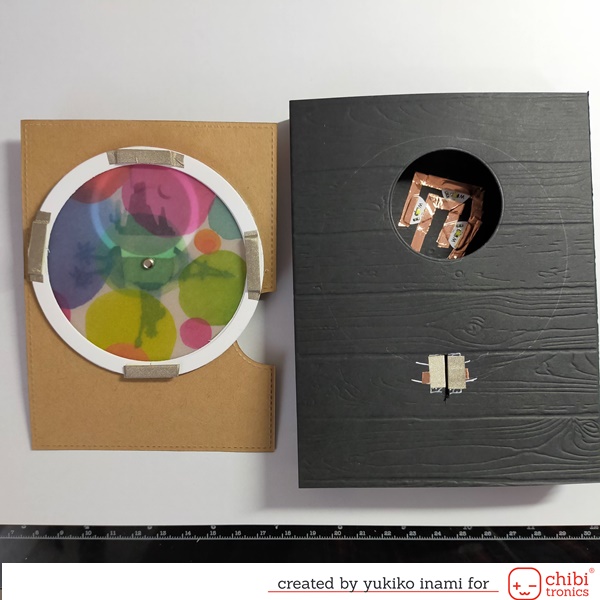
In this example, a die cut disk placed upon the outside of a shadow box rotates to switch lights on and off, depicting different travel destinations.
Shadow Picture Box by Yukiko Inami
Learn More
To learn more, I highly recommend that you check out How Are Things Connected?, a lesson designed to teach children the basics of how switches work. Classroom ready, this lesson plan contains links to useful templates, standards, and a framework for teaching children about a variety of switch types.
The monthly video series Chibitronics for Papercrafters, by Jessica Frost Ballas, is also essential viewing. Each month, she shares something new related to frequently asked questions from our craft community! Some useful topics already covered in this remarkable series include a variety of tips and tricks for building circuits, switches, and battery holders. For example, a simple switch may be created by adding a piece of cardstock between the battery and one of its conductive traces, to interrupt the flow of electricity. If you’re interested, this concept is explored in Episode 9: How to Mail a Light Up Card.
To view new projects and tutorials as they are posted, many of which integrate switches in innovative ways, I suggest visiting the Chibitronics Blog.
Lastly, for a more in depth exploration of sensors and switches, consider visiting Sensors and Switches Projects/Tutorials.